Disclosure:

I am a participant in the Amazon Services LLC Associates Program, an affiliate advertising program designed to provide a means for me to earn fees by linking to Amazon.com and affiliated sites.
Showing posts with label toy. Show all posts

Wednesday, June 26, 2019

Free Crochet Pattern: Reusable Water Bombs (balloons)

Hello and welcome to the blog. I have a very fun, quick & easy pattern to share with you today!

It's starting to warm up here in Wisconsin and my family loves a good outdoor game and if said game includes water it's a win, win! These balloons are much easier than filling tiny latex balloons, trying to tie them without cutting off the circulation to your fingers & lets not forget the clean up of tiny pieces of balloon all over the yard. The bonus of being able to reuse these balloons is a big deal for me!

I have been working with Bernat Blanket Yarn a lot lately and was able to use up all my scraps for these balloons, I also gave Bernat's Pipsqueak Yarn a try with this pattern using a double strand and the results were good but I do prefer the blanket yarn. I wanted to make sure my balloons would hold a good amount of water so I made little pom-poms and stuffed one inside of each balloon. I first tried stuffing some extra yarn pieces inside of some balloons and after being used the yarn started popping out through the stitches. Not a big deal, you can just push it back into the balloon but the pom-poms help keep the yarn gathered together inside better.

Thanks so much for stopping by! 
 -Jenni 

This pattern now has a video tutorial! Check it out below or find the By Jenni Designs channel on YouTube!


Skill Level: Easy

Size: Approx. 3"x 4"

Supplies:
12.0 mm Crochet Hook
Bernat Blanket Yarn
            -13 yards total for each balloon (including 2 yds. for each pom-pom)
Large Eye Tapestry Needle
Scissors

Abbreviations (US Terms):
Ch - Chain
Hdc - Half Double Crochet
Hdc2tog - Half Double Crochet 2 Together

Notes:
-Gauge is not important for this pattern but if you are a loose crocheter and feel your balloons are turning out too large or have big gaps between the stitches you can try going down a hook size.
-Joins are made with a slip stitch.
-This pattern uses a magic circle, if you don't know how to make one you can learn with this quick video tutorial: https://www.youtube.com/watch?v=64O9WVJucFA

This pattern now has a video tutorial, you can watch below or here on youtube: 
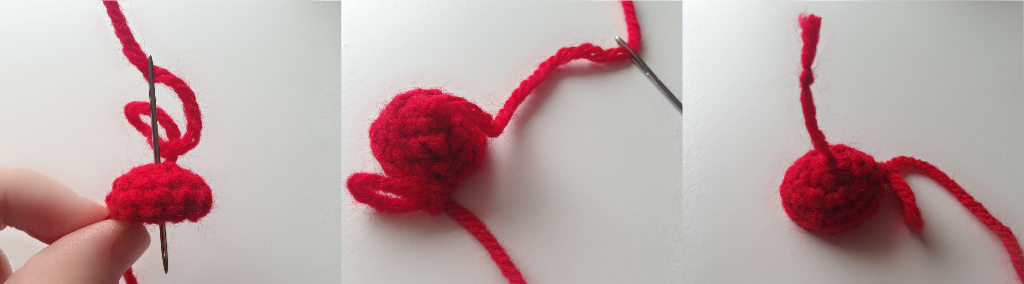


Pom-Pom's 


First you need to make your pom-pom's that are used for stuffing the balloons. You need one pom per balloon. I've put together easy steps for you to follow below:


Balloons
*For the stripe balloons I worked my 2nd color in row 4.

Row 1: Magic circle, ch 1, 6 hdc in circle. Join. (6)

*Pull circle tight & sew in end.

Row 2: Ch 1, 2 hdc in ea. around. Join. (12)
Row 3: Ch 1, *hdc in 5, 2 hdc in next.* Repeat *to* 1 more time. Join. (14)
Row 4: Ch 1, hdc in ea. around. Join. (14)
Row 5: Ch 1, hdc2tog, *hdc, hdc2tog.* Repeat *to* 3 more times. Join. (9)
*Insert one pom-pom at this time.
Row 6: Ch 1, hdc, *hdc2tog.* Repeat *to*  3 more times. Join. (5)
Row 7: Ch 1, 2 hdc in each. Join. (10)

Fasten off leaving about a 12" end, using your tapestry needle sew the balloon shut between rows 6 & 7. Sew in the remaining end.

Using the Balloons:
Now that you've crocheted up your group of balloons, you're ready to go and get this water balloon fight started! Using your balloons is easy, simply place them in a bucket (a bucket per person is helpful) and fill with water! That's it, let the battle begin! I hope your family enjoys these water balloons as much as mine does, I'd love to see your photos, you can either upload them to Ravelry as a project, share on the By Jenni Designs Facebook page or tag @byjennidesigns on Instagram.


Cleaning the Balloons:
 After use you can choose to just rinse your balloons well, squeeze out the excess water and lay in the sun to dry or if they've gotten muddy during play I suggest hand washing in your kitchen sink with laundry soap, rinse, squeeze out excess water and then lay out to dry.

Thursday, December 1, 2016

Free Crochet Amigurumi Pattern: Snowman (or Snowgirl) Amigurumi or Christmas Ornament


Hello and Happy Holidays!
This morning I am sharing a fun pattern for a snowman (or snowgirl) that can either be made as a toy or you can add an ornament hanger and use it as a Christmas ornament. I'd love to see your finished snow people, if you would like to share your pictures you can do so on my facebook here: facebook.com/byjennidesigns or add this pattern as a project on Ravelry!

Thanks for stopping by!
-Jenni


Skill Level: Intermediate 

Finished Size (depending on chosen hat): 6" x 4" with size G hook, 
5.5" x 3.75" with size F hook

Supplies:
Red Heart Super Saver worsted weight yarn 
      -50-75 yd. of white
      -Small amounts in brown, orange and choice colors for scarf & hat. 
Size G (4.0 mm) Hook or Size F (3.75 mm) Hook
Poly-fil
Tapestry Needle
Scissors
Stitch Marker 

Optional: Safety eyes, size 6 mm

Abbreviations (US Terms):
BLO - Back Loop Only

Ch - Chain
FLO - Front Loop Only
Hdc - Half Double Crochet
Sc - Single Crochet
Sc2tog - Single Crochet 2 Together

Sk - Skip
Sl st - Slip Stitch
Sp - Space

Important Notes:
-Sc2tog counts as an sc.
-Joins are made with a sl st. 

-Stitches places in these brackets [ ] indicate a group of stitches that should all be worked into the same space.
-This pattern calls for use of the magic circle (aka magic ring), if you do not know how to make a magic circle you can learn here: https://www.youtube.com/watch?v=64O9WVJucFA

-The body of the snowman is worked in the round. To keep track of your rows place a stitch marker in the last stitch of each row and proceed to move the stitch marker up at the end of each row.


Body


Using White:

Row 1: Magic circle, ch 1, 6 sc in circle. Pull circle tight and sew in end, do not join. (6)


Remember to place your stitch marker in the last stitch of the row and continue to move it to the last stitch of each row as you go.

Row 22 sc in the very first sc you made in row 1. (You will now be working in the round) 2 sc in next and in each around. (12)
Row 3: *Sc in next, 2 sc in next.* Repeat *to* around. (18)
Row 4: *Sc in next 2, 2 sc in next.* Repeat *to* around. (24)
Row 5: *Sc in next 3, 2 sc in next.* Repeat *to* around. (30)

Row 6-12: Sc in each around. (30)

Be sure to turn your piece right side out, if you don't it may be difficult to do so later on.

Row 13: *Sc in next 3, sc2tog.* Repeat *to* around. (24)
Row 14: *Sc in next 2, sc2tog.* Repeat *to* around. (18)

Start stuffing the snowman now and continue to do so as you go along. 

Row 15: Sc in each around. (18)
Row 16: *Sc in next 2, 2 sc in next.* Repeat *to* around. (24)
Row 17-21: Sc in each around. (24)
Row 22: *Sc in next 2, sc2tog.* Repeat *to* around. (18)

If you want to use buttons on your snowman or stitch on coal, it's easiest to do it now. 

Row 23: *Sc in next, sc2tog.* Repeat *to* around. (12)
Row 24: Sc in each around. (12)
Row 25: *Sc in next, 2 sc in next.* Repeat *to* around. (18)
Row 26-30: Sc in each around. (18)

You should now embroider on the carrot nose and eyes or if you are using safety eyes, you should add them now. As a guide, my eyes are worked within row 30, the nose is is in rows 28 & 29 and the smile is worked between rows 26 & 27.

Row 31: *Sc in next, sc2tog.* Repeat *to* around. (12)
Row 32: *Sc2tog.* Repeat *to* around. (6)
Sl sl into next to join then fasten off leaving a long end. 
Using the end, sew the hole shut & sew in the end. 


Arms

Using brown:

With the snowman upright and facing you, attach brown yarn with a sl st on the right side in row 19.


Ch 9, sl st in 2nd ch from hook and in next 2. Ch 3.


Sl st in 2nd ch from hook and in each remaining sp across. Fasten off. Using the end of your yarn and a tapestry needle, secure arm to the body then sew the ends into the arms to help make them stiffer. 


To make the 2nd arm, hold the snowman upside down while he is still facing you. Attach brown yarn with sl st in row 19.


Ch 9, sl st in 2nd ch from hook and in next 2. Ch 3. 


Sl st in 2nd ch from hook and in each remaining sp across. Fasten off. Using the end of your yarn and a tapestry needle, secure arm to the body then sew the ends into the arms to help make them stiffer.  


Scarf


Using two colors of choice:

Row 1: With first color: Ch 46, sc in 2nd ch from hook and in each across. (45 sc)
Fasten off.

Row 2: Join new color with a sl st. Ch 1, sc in each across. (45 sc)
Fasten off. 

Don't bother with sewing in your ends, instead add additional yarn pieces to the ends of the scarf and knot the pieces together to make fringe. 


Hat Choices


Beanie Hat

Using two colors of choice:

Starting with the color your would like for the hat:

Row 1: Magic circle, ch 1, 6 sc in circle. Join. (6 sc)
Row 2-3: Ch 1, 2 sc in each around. Join. (12 sc)

Fasten off.

Join contrast color with a sl st.

Row 4: Ch 1, sc in same, 2 sc in next. *Sc in next, 2 sc in next.* Repeat *to* around. Join. (18 sc)
Fasten off leaving a long end to sew hat to the top of the snowman.

Optional: Make a small pom-pom for the top of the hat and attach it to the top of the hat.

Stuff hat then sew hat to top of snowman and sew in ends.


Top Hat

Using Black & choice color:


Starting with black:

Row 1: Magic circle, ch 1, 6 sc in circle. Join. (6 sc)

Pull circle tight and sew in end.

Row 2: Ch 1, 2 sc in each around. Join. (12 sc)
Row 3: In BLO: Ch 1, sc in each around. Join. (12 sc)
Row 4-5: Ch 1, sc in each around. Join. (12 sc)
Fasten off.

Join contrast color with a sl st.

Row 6: Ch 1, sc in each around. Join. (12 sc)
Fasten off.

Join black in front loop with a sl st.

Row 7: In FLO: Ch 1, sc in same, 2 sc in next. *Sc in next, 2 sc in next.* Repeat *to* around. Join. (18 sc)
Row 8: Ch 1, 2 sc in same. sc in 2. *2 sc in next, sc in 2.* Repeat *to* around. Join. (24 sc)
Fasten off leaving a long end to sew hat to the top of the snowman.

Stuff hat then sew hat to top of snowman and sew in ends.


Baseball Cap

Using choice color:

Row 1: Magic circle, ch 1, 6 sc in circle. Pull circle tight. (6)

Pull circle tight and sew in end.

Row 2: Ch 1, 2 sc in each around. Join. (12)
Row 3: Ch 1, 2 sc in first, sc in 2. *2 sc in next, sc in 2.* Repeat *to* around. Join. (16)
Row 4-5: Ch 1, sc in each around. Join. (16)
Row 6: In FLO: Ch 1, sc in first 2, [sc, hdc] in next, [hdc, sc] in next, sc in next, sl st in next. (8)
Row 7: Ch 1, turn, sk first, sc in next 2, 2 sc in next 2, sc in 2, sl st in last.
Fasten off leaving a long end to sew hat to the top of the snowman.

Optional: Stitch on any letter you wish to the front of the hat.

Stuff hat then sew to the top of snowman, sew in ends.


Wednesday, June 1, 2016

Free Crochet Amigurumi Pattern: Turkey & Chicken Legs


These drumsticks were originally created a few months ago for my youngest son who was coming to me daily with new crochet food ideas! They are pretty easy to whip up but if you have any questions please feel free to ask.

Thanks for stopping by! 
-Jenni 


Skill Level: Easy

Finished Size:
       Chicken Drumstick - 6” x 2 ¾”
       Turkey Drumstick - 9” x 3 ¼”

Supplies:
Red Heart Super Saver, worsted weight yarn
       For Chicken Drumstick
            -55 yards brown, 7 yards white for each drumstick
       For Turkey Drumstick
            -66 yards brown, 12 yards white for each drumstick
Size G (4.0mm) Crochet Hook
Stitch Marker
Poly-fil
Tapestry Needle
Scissors

Stitch Abbreviations (US Terms):
Ch – Chain
FLO – Front Loop Only
Hdc – Half Double Crochet
Sc – Single Crochet
Sc2tog – Single Crochet 2 Together
Sl St – Slip Stitch
Sp – Space

Gauge:
5 sc & 6 rows = 1 inch

Important Notes:
-This pattern uses the Magic Circle, if you do not know how to make a magic circle (aka magic ring) check out my quick video here: https://youtu.be/64O9WVJucFA OR you can also Ch 2, then proceed to work your stitches into the first chain.
-Because this pattern is worked in the round, I recommend placing a stitch marker in the last sc of the row, moving it up as you go so you can easily keep track of your rows. 
-Sc2tog counts as one sc.


Chicken Drumstick 

Starting with brown: 

Row 1: Magic circle, ch 1, 6 sc in the circle. Pull circle tight, do not join. (6 sc)

(click to enlarge)

Row 2: 2 sc in the very first sc you made, you will now be working in the round. 2 Sc in next and in each around. (12 sc)
Row 3: *Sc in next, 2 sc in next.* Repeat *to* around. (18 sc)
Row 4: *Sc in next 2, 2 sc in next.* Repeat *to* around. (24 sc)
Row 5: *Sc in next 3, 2 sc in next.* Repeat *to* around. (30 sc)
Row 6: *Sc in next 4, 2 sc in next.* Repeat *to* around. (36 sc)
Row 7: Sc in next 2, 2 sc in next. *Sc in 11, 2 sc in next.* Repeat *to* one more time. Sc in last 9. (39 sc)
Row 8-12: Sc in each around. (39 sc)
Row 13: Sc in next 3, *Sc2tog, sc in 10.* Repeat *to* around. (36 sc)
Row 14-15: Sc in each around. (36 sc)

If you haven’t already, sew in your beginning end and turn the piece right side out.

Row 16: *Sc in next 4, sc2tog.* Repeat *to* around. (30 sc)
Row 17-18: Sc in each around. (30 sc)
Row 19: *Sc in next 8, sc2tog.* Repeat *to* around. (27 sc)
Row 20: Sc in each around. (27 sc)
Row 21: *Sc in next 7, sc2tog.* Repeat *to* around. (24 sc)
Row 22: Sc in each around. (24 sc)

You can start stuffing your piece with poly-fil now.

Row 23: *Sc in next 6, sc2tog.* Repeat *to* around. (21 sc)
Row 24: Sc in each around. (21 sc)
Row 25: *Sc in next 5, sc2tog.* Repeat *to* around. (18 sc)
Row 26: Sc in each around. (18 sc)
Row 27: *Sc in next 4, sc2tog.* Repeat *to* around. (15 sc)
Row 28-29: Sc in each around. (15 sc)
Row 30: Sc in each around, sl st loosely in the last sp. (14 sc, 1 sl st)
Row 31: In FLO: Sl st into first sp, [Ch 1, 3 hdc] in the same sp. *2 hdc in next, 3 hdc in next.* Repeat *to* around. Sl st to join. (38 hdc)

Fasten off.

Now using the back loops you didn’t use in row 31: 

Join white/off white yarn with a sl st in any sp.

Row 32: Ch 1, sc2tog, sc in next and in each around. Do not join. (14 sc)
Row 33: Sc in the very first sc of this row that you made, you will now be working in the round. Sc in the next sp and in each around. (14 sc)
Row 34-38: Sc in each around. (14 sc)

If you haven’t been stuffing as you go, finish stuffing now before moving on.

Row 39: *Sc2tog.* Repeat around. Join with a sl st to first sc2tog. (7 sc)

Fasten off and sew in the end.

Bone knobs
(Make 2)

Note: Joins are made with a sl st.

Row 1: Magic circle, ch 1, 6 sc in circle. Pull circle tight, join. (6 sc)
Row 2: Ch 1, 2 sc in first, sc in 2. 2 sc in next, sc in 2. Join. (8 sc)
Row 3: Ch 1, 2 sc in first, sc in 3. 2 sc in next, sc in 3. Join. (10 sc)

If you haven’t already, sew in your beginning end and turn the piece right side out.

Row 4: Ch 1, sc2tog, sc in 3, sc2tog, sc in 3. (8 sc)

Fasten off leaving a long end for sewing.

After you have made both bone knobs, sew them onto the end of the bone next to one another.


Sew in ends.


Turkey Drumstick 


Starting with brown: 

Row 1: Magic circle, ch 1, 6 sc in the circle. Pull circle tight, do not join. (6 sc)


Row 2: 2 sc in the very first sc you made, you will now be working in the round. 2 Sc in next and in each around. (12 sc)
Row 3: *Sc in next, 2 sc in next.* Repeat *to* around. (18 sc)
Row 4: *Sc in next 2, 2 sc in next.* Repeat *to* around. (24 sc)
Row 5: *Sc in next 3, 2 sc in next.* Repeat *to* around. (30 sc)
Row 6: *Sc in next 4, 2 sc in next.* Repeat *to* around. (36 sc)
Row 7: *Sc in next 5, 2 sc in next.* Repeat *to* around. (42 sc)
Row 8: Sc in next 2, 2 sc in next. *Sc in 6, 2 sc in next.* Repeat *to* until you have 4 sp left. Sc in last 4. (48 sc)
Row 9-18: Sc in each around. (48 sc)
Row 19: *Sc in next 6, sc2tog.* Repeat *to* around. (42 sc)

If you haven’t already, sew in your beginning end and turn the piece right side out.

Row 20-24: Sc in each around. (42 sc)
Row 25: *Sc in next 5, sc2tog.* Repeat *to* around. (36 sc)
Row 26-28: Sc in each around. (36 sc)
Row 29: *Sc in next 10, sc2tog.* Repeat *to* around. (33 sc)
Row 30-31: Sc in each around. (33 sc)
Row 32: *Sc in next 9, sc2tog.* Repeat *to* around. (30 sc)

You can start stuffing your piece with poly-fil now.

Row 33-34: Sc in each around. (30 sc)
Row 35: *Sc in next 8, sc2tog.* Repeat *to* around. (27 sc)
Row 36: Sc in each around. (27 sc)
Row 37: *Sc in next 7, sc2tog.* Repeat *to* around. (24 sc)
Row 38: Sc in each around. (24 sc)
Row 39: *Sc in next 6, sc2tog.* Repeat *to* around. (21 sc)
Row 40: Sc in each around. (21 sc)
Row 41: Sc in each around, sl st loosely in the last sp. (20 sc, 1 sl st)
Row 42: In FLO: Sl st into first sp, [Ch 1, 3 hdc] in the same sp. 2 hdc in next, *3 hdc in next, 2 hdc in next.* Repeat *to* around. Sl st to join.

Fasten off.

Now using the back loops you didn’t use in row 42: 

Join white/off white yarn with a sl st in any sp.

Row 43: Ch 1, sc2tog, sc in next and in each around. Do not join. (20 sc)
Row 44: Sc in the very first sc of this row that you made, you will now be working in the round. Sc in the next sp and in each aroaund. (20 sc)
Row 45-51: Sc in each around. (20 sc)
Row 52: *Sc, sc, sc2tog.* Repeat *to*around. (15 sc)

If you haven’t been stuffing as you go, finish stuffing now before moving on.

Row 53: *Sc in 3, sc2tog.* Repeat *to* around. (12 sc)
Row 54: *Sc2tog.* Repeat around. (6 sc)

Fasten off and sew in the end.

Bone knobs 
(make 2)

Note: Joins are made with a sl st.

Row 1: Magic circle, ch 1, 6 sc in circle. Pull circle tight and join. (6 sc)
Row 2: Ch 1, 2 sc in each around. Join. (12 sc)
Row 3: Ch 1, *Sc in 5, 2 sc in next.* Repeat *to* around. Join. (14 sc)

If you haven’t already, sew in your beginning end and turn the piece right side out.

Row 4-5: Ch 1, sc in each around. Join. (14 sc)
Row 6: Ch 1, Sc2tog. *Sc, sc2tog.* Repeat *to* around. (9 sc)

Fasten off leaving a long end for sewing.

After you have made both bone knobs, sew them onto the end of the bone next to one another.


Sew in ends.


All done, enjoy!


If you enjoyed this pattern you might want to check out even more
By Jenni Designs play food patterns!

                                          Bologna Sandwich                               Pizza Slice

                                       Cherry on top Cupcake                  Lemon or Lime Wedge


Thursday, April 14, 2016

Free Crochet Amigurumi Pattern: Cherry on top Cupcake

(Shown in (Cherries) Red Heart With Love Berry Red
(Pink Cupcake) Big Twist Value Light Rose & I Love This Yarn! Coffee
(Blue Cupcake) Red Heart Super Saver TurquaI Love This Yarn! Coffee &
Random bits of yarn for sprinkles)


I've been working on this group of cupcakes for a few weeks now, my son kept coming up with new ideas for topping the cupcakes but I think he's finally run out (maybe)! His crochet food collection has grown quite a bit this winter/spring! I've written the cupcake and cherry patterns here but the patterns for the strawberry, carrot & lemon/lime wedge are in separate posts for the sake of this post not running on forever and ever.

Below are the links to each pattern.


 Don't worry much about gauge, just be sure to work your stitches tight. 

Enjoy and thanks for stopping by!
-Jenni


Skill Level: Easy/Intermediate

Finished size: 2.5"W x 3.75"H (with cherry)

Supplies:
Worsted Weight Yarn in red for the cherry and 2 choice colors for the cupcake & frosting
Optional: Additional yarn in various colors for sprinkles.
Size G (4.0 mm) Crochet Hook
Tapestry needle
Stitch marker
Scissors
Polyfil
Optional: Small piece of cardboard

Abbreviations (US Terms):
BLO - Black Loop Only
Ch - Chain
Dc - Double Crochet
Fphdc - Front Post Half Double Crochet
Hdc - Half Double Crochet
Sc - Single Crochet
Sl st - Slip Stitch

Important Notes:
-Ch 1 does not count as a stitch.
-All joins are made with a sl st.
-Sc2tog counts as one sc.
-Your first stitch of each row will always be worked in the same space as your ch 1 or ch 2.
-This pattern uses the Magic Circle, if you do not know how to make a magic circle you can learn with my quick video here: https://youtu.be/64O9WVJucFA

Cupcake

With Cake color:

Row 1: Magic circle, ch 1, 6 sc in circle. Join. (6 sc)
Row 2: Ch 1, 2 sc in each around. Join. (12 sc)
Row 3: Ch 1, *sc, 2 sc in next.* Repeat *to* around. Join. (18 sc)
Row 4: Ch 1, *sc in 2, 2 sc in next.* Repeat *to* around. Join. (24 sc)
Row 5: Ch 1, *sc in 3, 2 sc in next.* Repeat *to* around. Join. (30 sc)

Sew in your beginning end.

Optional: If you would like your cupcake to stand up perfectly, trace the circle you've made onto a piece of cardboard. Cut out the cardboard circle slightly smaller than the traced circle and then place the piece of cardboard into the bottom of the cupcake. The cupcake will stand without the cardboard bottom but this makes for a very nice flat bottom.


Row 6: In BLO: Ch 1, hdc in each around. Join. (30 hdc)
Row 7-11: Ch 1, *hdc, fphdc around next.* Repeat *to* around. Join. (15 hdc, 15 fphdc)
Fasten off.

Place a stitch marker in the front loop on the first hdc you made on row 11.


With Frosting color:

Join with a sl st in the back loop of any stitch.

Row 12: In BLO: Ch 1, sc in each around. Join. (30 sc)
Row 13: Ch 1, *sc in 8, sc2tog.* Repeat *to* around. Join. (27 sc)
Row 14: Ch 1, *sc in 7, sc2tog.* Repeat *to* around. Join. (24 sc)
Row 15: Ch 1, *sc in 6, sc2tog.* Repeat *to* around. Join. (21 sc)
Row 16: Ch 1, *sc in 5, sc2tog.* Repeat *to* around. Join. (18 sc)
Row 17: Ch 1, *sc in 4, sc2tog.* Repeat *to* around. Join. (15 sc)

Begin to stuff your cupcake and continue to do so as you go.
Now is also a good time to start stitching on sprinkles if you would like them.


Row 18: Ch 1, *sc in 3, sc2tog.* Repeat *to* around. Join. (12 sc)
Row 19: Ch 1, *sc in 2, sc2tog.* Repeat *to* around. Join. (9 sc)

Fasten off leaving a long end for sewing, sew hole shut and sew in end.


With Frosting color:

Hold the cupcake with the frosting top facing you.
Join with a sl st in the space your stitch marker is in, you can now remove the stitch marker.


Row 20: Ch 2, 2 dc in first. 3 dc in next and in each around. Join.

Fasten off and sew in ends.


Cherry

With Red:

Row 1: Magic circle, ch 1, 6 sc in circle. Join. (6 sc)
Row 2: Ch 1, *sc, 2 sc in next.* Repeat *to* around. Join. (9 sc)
Row 3: Ch 1, *sc in 2, 2 sc in next.* Repeat *to* around. Join. (12 sc)

Now is a good time to secure your beginning end.
If you want a stem on your cherry pull this end through to the right side of the cherry after securing it. Tie a knot as close as you can to the cherry and tie another knot about an inch or two away from the cherry. Trim.


Row 4: Ch 1, sc in each around. Join. (12 sc)
Row 5: Ch 1, *sc in 2, sc2tog.* Repeat *to* around. Join. (9 sc)
Row 6: Ch 1, *sc, sc2tog.* Repeat *to* around. Join. (6 sc)

Fasten off leaving a long end to sew the cherry to the top of the cupcake.

Sew cherry to the cupcake then sew in your end.


Free Crochet Pattern: Tiny Carrot

(Shown in Lion Brand Vanna's Choice Kelly Green & Terracotta)

Skill Level: Easy

Finished Size: 2.25" (with stems)

Supplies:
Worsted Weight Yarn in orange & green
Size G (4.0 mm) Crochet Hook
Tapestry Needle
Scissors
Poly-fil

Abbreviations (US Terms):
BLO - Back Loop Only
Ch - Chain
Sc - Single Crochet
Sc2tog - Single Crochet 2 Together
Sl st - Slip Stitch

Important Notes:
-All joins are made with a sl st.
-Your first stitch is always worked in the same space as the ch 1.
-Sc2tog counts as one sc.
-This pattern uses the Magic Circle, if you do not know how to make a magic circle you can learn with my quick video here: https://youtu.be/64O9WVJucFA

Row 1: Magic circle, ch 1, 6 sc in circle. Join. (6 sc)
Row 2: Ch 1, *2 sc, sc in 2.* Repeat *to* around. Join. (8 sc)

If you haven't already, sew in your beginning end.

Row 3-7: Ch 1, sc in each around. Join. (8 sc)

Stuff carrot before moving on.

Row 8: In BLO: *Sc2tog.* Repeat *to* around. Join. (4 sc)

Fasten off leaving a long end, sew top of carrot shut.

Now using green yarn, cut 3 strands about 4" in length. Use your needle to add each strand to the top of the carrot then knot all three strands together and trim to an inch or so in length.


This pattern was originally written as a topper for a cupcake, they compliment the cupcake well!

You can find the cupcake pattern here: With a Cherry on top Cupcake


If you would like to make even more carrots, I have free patterns for additional sizes which you can find here: Baby Carrots  and here: Large Carrots


Free Crochet Amigurumi Pattern: Strawberry


Skill Level: Easy

Finished Size: 2" x 1.25" (including stems)

Supplies:
Worsted weight yarn in red, white & green
Size G (4.0 mm) Crochet Hook
Tapestry Needle
Scissors
Poly-fil

Abbreviations (US Terms):
BLO - Back Loop Only
Ch - Chain
Sc - Single Crochet
Sc2tog - Single Crochet 2 Together
Sl st - Slip Stitch

Important Notes:
-All joins are made with a sl st.
-Your first stitch is always worked in the same space as the ch 1.
-Sc2tog counts as 1 sc.
-Gauge is not important for this pattern just be sure to work your stitches tight so your stuffing doesn't show through.

Row 1: Ch 4, sc in 2nd ch from hook, sc in next, 3 sc in last.

Rotate piece to the right so you can work on the opposite side of the foundation chain.

Sc in next, 2 sc in next. Join. (8 sc)

Row 2: Ch 1, 2 sc in first, sc in 2. 2 sc in each of the next 2, sc in 2, 2 sc in last. Join. (12 sc)
Row 3-7: Ch 1, sc in each around. Join. (12 sc)

Before moving on, use white yarn to stitch on little seeds.


Row 8: In BLO: Ch 1, *Sc in 2, sc2tog.* Repeat *to* around. Join. (9 sc)

Fasten off leaving a long end to sew your opening shut.


Now, the final step is adding the little green stems. Cut 3-5 strands of green yarn about 4" in length, then use your needle to slip each piece through the top of the strawberry. Tie each piece on with a knot, knot a 2nd time to secure yarn. Trim to about an inch in length.


This pattern was originally written as a topper for a cupcake, they compliment the cupcake well! 

You can find the cupcake pattern here: With a Cherry on top Cupcake


Wednesday, April 6, 2016

Free Crochet Pattern Tutorial: Ammo Shoulder Belt for Toy Dart Bullets


My four boys have always been big Nerf fans and last weekend my youngest came to me wanting something to hold his ammo, he described exactly what he wanted and this was our results! The tutorial as written is in his size but you can easily adjust the beginning chain to make this belt slightly larger. Writing this out was no easy task but I hope I've explained it well enough for you to understand, I suggest scrolling through the photos before starting to give you an idea of the construction of the belt.

For my example I used Hobby Lobby's I Love this Yarn for the Camo portion but I've suggested Red Heart Super Saver because it's more readily available. Either will work just fine. My little guy and I would love to see your finished Ammo Belts, if you would like to share feel free to upload to my facebook page here: www.facebook.com/byjennidesigns or add to your Ravelry projects here: Ammo Shoulder Belt

Thanks for stopping by!
-Jenni


Size: Kids 5+ years

Supplies:
Red Heart Super Saver in black & camouflage
Size I (5.5 mm) Crochet Hook
Stitch Markers
Tapestry Needle
Scissors

Stitch Abbreviations (US Terms):
Ch - Chain
Dc - Double Crochet
Dc2tog - Double Crochet 2 Together
FLO - Front Loop Only
Rs - Right Side
Sc - Single Crochet
Sl st - Slip Stitch
Sp - Space

Gauge:
3.5 dc & 2 rows = 1"

Important Note:
-Joins are made with sl st.


Shoulder Belt

With Black:

Ch 140, join.
Place chain over child's head, placing one side of the chain on the shoulder and the other side of the chain should be at about the child's hip. The chain should not be tight against their body, you want it to be slightly loose.

Row 1: Ch 2, dc in each around. Join.
Row 2-5: Ch 2, dc2tog, dc in next and in each around.

Fasten off after row 5.
Join with camo yarn in the same space as you fastened off in.

Row 6: Ch 1, sc2tog, sc in next and in each around.

Fasten off.


Bullet Pocket

Now, place the belt on your child again with row 6 closest to the neck and with the yarn ends on the child's shoulder (as shown below). Then you need to mark where you want your bullets to go, I marked off a total of 48 stitches.


After marking your stitches, you can remove the belt from the child.

Using camo yarn:

Quick note: Before joining in the next row leave a long end for sewing later.

Row 7: In FLO: Join with a sl st in the space you marked closest to the fasten off. Sc in each across until you reach your 2nd stitch marker.


Row 8-12: Ch 1, turn, hdc in each across.
Row 13: Ch 1, turn, sc in each across.

After row 13, you need to sl st down the side of the pocket you just made.


Ch 1, sc in the next open space on the belt portion.


Sc in next and in each around. Join to the first sc you made on the belt and fasten off leaving a long end.  


Use the ends on the sides of the pocket you created to sew the sides of the pocket down to the belt. Sew in your ends.

Next, decide if you want to sew each bullet space or if you want to sl st around every other bullet to create the spaces. Below you can see how I slip stitched around every other bullet.


To sl st, I first placed a bullet into the pocket all the way to the right then I joined just to the left of the bullet, started to sl st down, placed the 2nd bullet in the pocket then worked my way around the bottom and up the side then fastened off. Repeat to end. Our belt ended up fitting 11 bullets.


Now, sew in all those nasty ends.

Place on child and now you have a soldier ready for a nerf battle!