Disclosure:

I am a participant in the Amazon Services LLC Associates Program, an affiliate advertising program designed to provide a means for me to earn fees by linking to Amazon.com and affiliated sites.
Showing posts with label cupcake. Show all posts

Thursday, April 14, 2016

Free Crochet Amigurumi Pattern: Cherry on top Cupcake

(Shown in (Cherries) Red Heart With Love Berry Red
(Pink Cupcake) Big Twist Value Light Rose & I Love This Yarn! Coffee
(Blue Cupcake) Red Heart Super Saver TurquaI Love This Yarn! Coffee &
Random bits of yarn for sprinkles)


I've been working on this group of cupcakes for a few weeks now, my son kept coming up with new ideas for topping the cupcakes but I think he's finally run out (maybe)! His crochet food collection has grown quite a bit this winter/spring! I've written the cupcake and cherry patterns here but the patterns for the strawberry, carrot & lemon/lime wedge are in separate posts for the sake of this post not running on forever and ever.

Below are the links to each pattern.


 Don't worry much about gauge, just be sure to work your stitches tight. 

Enjoy and thanks for stopping by!
-Jenni


Skill Level: Easy/Intermediate

Finished size: 2.5"W x 3.75"H (with cherry)

Supplies:
Worsted Weight Yarn in red for the cherry and 2 choice colors for the cupcake & frosting
Optional: Additional yarn in various colors for sprinkles.
Size G (4.0 mm) Crochet Hook
Tapestry needle
Stitch marker
Scissors
Polyfil
Optional: Small piece of cardboard

Abbreviations (US Terms):
BLO - Black Loop Only
Ch - Chain
Dc - Double Crochet
Fphdc - Front Post Half Double Crochet
Hdc - Half Double Crochet
Sc - Single Crochet
Sl st - Slip Stitch

Important Notes:
-Ch 1 does not count as a stitch.
-All joins are made with a sl st.
-Sc2tog counts as one sc.
-Your first stitch of each row will always be worked in the same space as your ch 1 or ch 2.
-This pattern uses the Magic Circle, if you do not know how to make a magic circle you can learn with my quick video here: https://youtu.be/64O9WVJucFA

Cupcake

With Cake color:

Row 1: Magic circle, ch 1, 6 sc in circle. Join. (6 sc)
Row 2: Ch 1, 2 sc in each around. Join. (12 sc)
Row 3: Ch 1, *sc, 2 sc in next.* Repeat *to* around. Join. (18 sc)
Row 4: Ch 1, *sc in 2, 2 sc in next.* Repeat *to* around. Join. (24 sc)
Row 5: Ch 1, *sc in 3, 2 sc in next.* Repeat *to* around. Join. (30 sc)

Sew in your beginning end.

Optional: If you would like your cupcake to stand up perfectly, trace the circle you've made onto a piece of cardboard. Cut out the cardboard circle slightly smaller than the traced circle and then place the piece of cardboard into the bottom of the cupcake. The cupcake will stand without the cardboard bottom but this makes for a very nice flat bottom.


Row 6: In BLO: Ch 1, hdc in each around. Join. (30 hdc)
Row 7-11: Ch 1, *hdc, fphdc around next.* Repeat *to* around. Join. (15 hdc, 15 fphdc)
Fasten off.

Place a stitch marker in the front loop on the first hdc you made on row 11.


With Frosting color:

Join with a sl st in the back loop of any stitch.

Row 12: In BLO: Ch 1, sc in each around. Join. (30 sc)
Row 13: Ch 1, *sc in 8, sc2tog.* Repeat *to* around. Join. (27 sc)
Row 14: Ch 1, *sc in 7, sc2tog.* Repeat *to* around. Join. (24 sc)
Row 15: Ch 1, *sc in 6, sc2tog.* Repeat *to* around. Join. (21 sc)
Row 16: Ch 1, *sc in 5, sc2tog.* Repeat *to* around. Join. (18 sc)
Row 17: Ch 1, *sc in 4, sc2tog.* Repeat *to* around. Join. (15 sc)

Begin to stuff your cupcake and continue to do so as you go.
Now is also a good time to start stitching on sprinkles if you would like them.


Row 18: Ch 1, *sc in 3, sc2tog.* Repeat *to* around. Join. (12 sc)
Row 19: Ch 1, *sc in 2, sc2tog.* Repeat *to* around. Join. (9 sc)

Fasten off leaving a long end for sewing, sew hole shut and sew in end.


With Frosting color:

Hold the cupcake with the frosting top facing you.
Join with a sl st in the space your stitch marker is in, you can now remove the stitch marker.


Row 20: Ch 2, 2 dc in first. 3 dc in next and in each around. Join.

Fasten off and sew in ends.


Cherry

With Red:

Row 1: Magic circle, ch 1, 6 sc in circle. Join. (6 sc)
Row 2: Ch 1, *sc, 2 sc in next.* Repeat *to* around. Join. (9 sc)
Row 3: Ch 1, *sc in 2, 2 sc in next.* Repeat *to* around. Join. (12 sc)

Now is a good time to secure your beginning end.
If you want a stem on your cherry pull this end through to the right side of the cherry after securing it. Tie a knot as close as you can to the cherry and tie another knot about an inch or two away from the cherry. Trim.
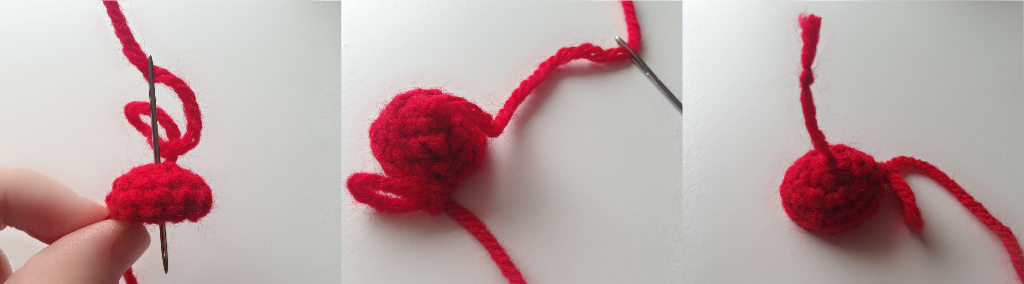

Row 4: Ch 1, sc in each around. Join. (12 sc)
Row 5: Ch 1, *sc in 2, sc2tog.* Repeat *to* around. Join. (9 sc)
Row 6: Ch 1, *sc, sc2tog.* Repeat *to* around. Join. (6 sc)

Fasten off leaving a long end to sew the cherry to the top of the cupcake.

Sew cherry to the cupcake then sew in your end.


Friday, April 17, 2015

Free Crochet Pattern: Youth Size Crochet Cupcake Hat

(Shown in Red Heart With Love Bubble Gum, Tan & Berry Red)

Skill Level: Easy/Intermediate

Size: Youth, 4-9 years, 20-21" head circumference

Supplies:
Red Heart With Love, worsted weight yarn in choice colors
Tapestry needle
Scissors

Abbreviations (US Terms):
BLO - Back Loop Only
Ch - Chain
Dc - Double Crochet
FLO - Front Loop Only
Fpdc - Front Post Double Crochet
Sc - Single Crochet
Sk - Skip
Sl St - Slip Stitch
Tr - Treble Crochet

Notes:
-Joins are made with sl st.
-Joins should be made to the first dc, not the ch 2.
-Ch 2's do not count as a dc.
-Gauge: 4 dc & 2 rows = 1"

Hat
With size I hook & frosting color:

Row 1: Magic Circle, ch 2, 11 dc in circle. Join. (11 dc)
Row 2: Ch 2, 2 dc in same and in each around. Join. (22 dc)
Row 3: Ch 2, 2 dc in same, dc in next. *2 dc in next, dc in next.* Repeat *to* around. Join. (33 dc)
Row 4: Ch 2, 2 dc in same, dc in next 2. *2 dc in next, dc in next 2.* Repeat *to* around. Join. (44 dc)
Row 5: Ch 2, 2 dc in same, dc in next 3. *2 dc in next, dc in next 3.* Repeat *to* around. Join. (55 dc)
Row 6: Ch 2, 2 dc in same, dc in next 4. *2 dc in next, dc in next 4.* Repeat *to* around. Join. (66 dc)

Your circle should measure about 6" across the center.

Row 7-11: Ch 2, dc in same and in each around. Join. (66 dc)
Row 12: IN FLO: *Sk 2, in next: [dc, 4 tr, dc], sk 1, sl st in 2.* Repeat *to* around. Do not fasten off, instead pull up a loop and leave the yarn attached. Remove your hook. We will come back to this after finishing the cupcake portion of the hat.


-The next row is worked in the un-worked back loops from the previous row, hold down the shells while working around. Be sure to count your stitches at the end of the next row and be sure you have 66 dc.


Using size I hook & cupcake color:
Row 13: IN BLO: Ch 3 (counts as dc), dc in next and in each around. Join to 3rd chain. (66 dc)
Row 14-18: Ch 3 (counts as dc), fpdc around next. *Dc in next, fpdc around next* Repeat *to* around. Join to 3rd chain.

-Work the next row loosely.

Row 19: Ch 1, turn, sl st in next and in each around. Join, fasten off and sew in ends.

Now using your frosting color again: Insert your hook into the loop you left loose earlier, *Sl st, ch 1* around the hat repeating from *to* just above the shells you created, this will help the shells to lay nicely. Fasten off and sew in ends.

Cherry
Using size H hook & cherry color:

Row 1: Magic circle, ch 1, 6 sc in circle. Pull magic circle tight, join. (6 sc)
Row 2: Ch 1, 2 sc in each around. Join. (12 sc)
Row 3: Ch 1, sc in same, 2 sc in next. *Sc in next, 2 sc in next.* Repeat *to* around. Join. (18 sc)
Row 4: Ch 1, sc in each around. Join. (18 sc)
Row 5: Ch 1, sc in same, sc2tog. *sc in next, sc2tog.* Repeat *to* around. Join. (12 sc)
Row 6: Ch 1, sc in same, sc2tog. *sc in next, sc2tog.* Repeat *to* around. Join. (8 sc)
You should now fill your cherry with poly-fil or small ends of yarn work like a charm too!
Row 7: Ch 1, sc2tog 4 times. Join.
Fasten off leaving long enough end to sew onto top of hat.
If needed, sew bottom of cherry closed. Sew on to hat and either sew in the end or pull it through the top of the cherry to make a stem. Tie a knot in the stem as close to the top of the cherry as possible so it will stay in place.

Optional: You can now add sprinkles to the top of the hat by tying on yarn pieces in multiple colors or leave it as is. I've also created the same hat using Red Heart Super Saver Coffee Fleck, this fun yarn makes sprinkles easy!

Sunday, March 29, 2015

Free Crochet Pattern: Cupcake Applique


Recently I needed a little something to jazz up a birthday card so I crocheted up this cupcake applique. This is pretty easy pattern and the fun Bernat Dippity Dots yarn is so perfect for this project! 

Thanks so much for stopping by!
-Jenni

Skill Level: Easy

Finished Size: Approx. 3" x 2.5"

Supplies:
Size H (5.0 mm) Crochet Hook
Worsted Weight Yarn for cupcake & cherry
Bernat Dippity Dots Yarn for frosting (or worsted weight yarn of choice)
Tapestry Needle
Scissors

Abbreviations (US Terms):
BLO - Back Loops Only
Ch - Chain
FLO - Front Loops Only
Hdc - Half Double Crochet
Hdc2tog - Half Double Crochet 2 Together
Sl st - Slip Stitch
Sp - Space

Note:
-Joins are made with sl st.

With Frosting Color:
Row 1: Ch 4, 2 hdc in 2nd ch from hook, hdc in next, 2 hdc in last. Ch 1, turn. (5 hdc)
Row 2: 2 hdc in same, hdc in 3, 2 hdc in last. Ch 1, turn. (7 hdc)
Row 3: 2 hdc in same, hdc in 5, 2 hdc in last. Ch 1, turn. (9 hdc)
Row 4: In FLO: [Hdc, dc, hdc] all in the same sp. *Sl st in next, [hdc, dc, hdc] in next* Repeat *to* to end.
Fasten off leaving long end for sewing.

The next row will be worked in the un-worked back loops.

Join with Cupcake Color:
Row 5: In BLO: Ch 1, hdc in same and in each across. Ch 1, turn. (9 hdc)
Row 6: Hdc in same and in each across. Ch 1, turn. (9 hdc)
Row 7: Hdc2tog, hdc in 5, hdc2tog. Ch 1, turn.
Row 8: Sc2tog, sc in 3, sc2tog.
Fasten off leaving long end for sewing.

Join with Cherry Color in top, center space of cupcake.
[Sc, hdc, hdc, sl st] all in the same sp.
Fasten off and sew in ends.