Disclosure:

I am a participant in the Amazon Services LLC Associates Program, an affiliate advertising program designed to provide a means for me to earn fees by linking to Amazon.com and affiliated sites.
Showing posts with label crochet. Show all posts

Thursday, December 1, 2016

Free Crochet Amigurumi Pattern: Snowman (or Snowgirl) Amigurumi or Christmas Ornament


Hello and Happy Holidays!
This morning I am sharing a fun pattern for a snowman (or snowgirl) that can either be made as a toy or you can add an ornament hanger and use it as a Christmas ornament. I'd love to see your finished snow people, if you would like to share your pictures you can do so on my facebook here: facebook.com/byjennidesigns or add this pattern as a project on Ravelry!

Thanks for stopping by!
-Jenni


Skill Level: Intermediate 

Finished Size (depending on chosen hat): 6" x 4" with size G hook, 
5.5" x 3.75" with size F hook

Supplies:
Red Heart Super Saver worsted weight yarn 
      -50-75 yd. of white
      -Small amounts in brown, orange and choice colors for scarf & hat. 
Size G (4.0 mm) Hook or Size F (3.75 mm) Hook
Poly-fil
Tapestry Needle
Scissors
Stitch Marker 

Optional: Safety eyes, size 6 mm

Abbreviations (US Terms):
BLO - Back Loop Only

Ch - Chain
FLO - Front Loop Only
Hdc - Half Double Crochet
Sc - Single Crochet
Sc2tog - Single Crochet 2 Together

Sk - Skip
Sl st - Slip Stitch
Sp - Space

Important Notes:
-Sc2tog counts as an sc.
-Joins are made with a sl st. 

-Stitches places in these brackets [ ] indicate a group of stitches that should all be worked into the same space.
-This pattern calls for use of the magic circle (aka magic ring), if you do not know how to make a magic circle you can learn here: https://www.youtube.com/watch?v=64O9WVJucFA

-The body of the snowman is worked in the round. To keep track of your rows place a stitch marker in the last stitch of each row and proceed to move the stitch marker up at the end of each row.


Body


Using White:

Row 1: Magic circle, ch 1, 6 sc in circle. Pull circle tight and sew in end, do not join. (6)


Remember to place your stitch marker in the last stitch of the row and continue to move it to the last stitch of each row as you go.

Row 2: 2 sc in the very first sc you made in row 1. (You will now be working in the round) 2 sc in next and in each around. (12)
Row 3: *Sc in next, 2 sc in next.* Repeat *to* around. (18)
Row 4: *Sc in next 2, 2 sc in next.* Repeat *to* around. (24)
Row 5: *Sc in next 3, 2 sc in next.* Repeat *to* around. (30)

Row 6-12: Sc in each around. (30)

Be sure to turn your piece right side out, if you don't it may be difficult to do so later on.

Row 13: *Sc in next 3, sc2tog.* Repeat *to* around. (24)
Row 14: *Sc in next 2, sc2tog.* Repeat *to* around. (18)

Start stuffing the snowman now and continue to do so as you go along. 

Row 15: Sc in each around. (18)
Row 16: *Sc in next 2, 2 sc in next.* Repeat *to* around. (24)
Row 17-21: Sc in each around. (24)
Row 22: *Sc in next 2, sc2tog.* Repeat *to* around. (18)

If you want to use buttons on your snowman or stitch on coal, it's easiest to do it now. 

Row 23: *Sc in next, sc2tog.* Repeat *to* around. (12)
Row 24: Sc in each around. (12)
Row 25: *Sc in next, 2 sc in next.* Repeat *to* around. (18)
Row 26-30: Sc in each around. (18)

You should now embroider on the carrot nose and eyes or if you are using safety eyes, you should add them now. As a guide, my eyes are worked within row 30, the nose is is in rows 28 & 29 and the smile is worked between rows 26 & 27.

Row 31: *Sc in next, sc2tog.* Repeat *to* around. (12)
Row 32: *Sc2tog.* Repeat *to* around. (6)
Sl sl into next to join then fasten off leaving a long end. 
Using the end, sew the hole shut & sew in the end. 


Arms

Using brown:

With the snowman upright and facing you, attach brown yarn with a sl st on the right side in row 19.


Ch 9, sl st in 2nd ch from hook and in next 2. Ch 3.


Sl st in 2nd ch from hook and in each remaining sp across. Fasten off. Using the end of your yarn and a tapestry needle, secure arm to the body then sew the ends into the arms to help make them stiffer. 


To make the 2nd arm, hold the snowman upside down while he is still facing you. Attach brown yarn with sl st in row 19.


Ch 9, sl st in 2nd ch from hook and in next 2. Ch 3. 


Sl st in 2nd ch from hook and in each remaining sp across. Fasten off. Using the end of your yarn and a tapestry needle, secure arm to the body then sew the ends into the arms to help make them stiffer.  


Scarf


Using two colors of choice:

Row 1: With first color: Ch 46, sc in 2nd ch from hook and in each across. (45 sc)
Fasten off.

Row 2: Join new color with a sl st. Ch 1, sc in each across. (45 sc)
Fasten off. 

Don't bother with sewing in your ends, instead add additional yarn pieces to the ends of the scarf and knot the pieces together to make fringe. 


Hat Choices


Beanie Hat

Using two colors of choice:

Starting with the color your would like for the hat:

Row 1: Magic circle, ch 1, 6 sc in circle. Join. (6 sc)
Row 2-3: Ch 1, 2 sc in each around. Join. (12 sc)

Fasten off.

Join contrast color with a sl st.

Row 4: Ch 1, sc in same, 2 sc in next. *Sc in next, 2 sc in next.* Repeat *to* around. Join. (18 sc)
Fasten off leaving a long end to sew hat to the top of the snowman.

Optional: Make a small pom-pom for the top of the hat and attach it to the top of the hat.

Stuff hat then sew hat to top of snowman and sew in ends.


Top Hat

Using Black & choice color:


Starting with black:

Row 1: Magic circle, ch 1, 6 sc in circle. Join. (6 sc)

Pull circle tight and sew in end.

Row 2: Ch 1, 2 sc in each around. Join. (12 sc)
Row 3: In BLO: Ch 1, sc in each around. Join. (12 sc)
Row 4-5: Ch 1, sc in each around. Join. (12 sc)
Fasten off.

Join contrast color with a sl st.

Row 6: Ch 1, sc in each around. Join. (12 sc)
Fasten off.

Join black in front loop with a sl st.

Row 7: In FLO: Ch 1, sc in same, 2 sc in next. *Sc in next, 2 sc in next.* Repeat *to* around. Join. (18 sc)
Row 8: Ch 1, 2 sc in same. sc in 2. *2 sc in next, sc in 2.* Repeat *to* around. Join. (24 sc)
Fasten off leaving a long end to sew hat to the top of the snowman.

Stuff hat then sew hat to top of snowman and sew in ends.


Baseball Cap

Using choice color:

Row 1: Magic circle, ch 1, 6 sc in circle. Pull circle tight. (6)

Pull circle tight and sew in end.

Row 2: Ch 1, 2 sc in each around. Join. (12)
Row 3: Ch 1, 2 sc in first, sc in 2. *2 sc in next, sc in 2.* Repeat *to* around. Join. (16)
Row 4-5: Ch 1, sc in each around. Join. (16)
Row 6: In FLO: Ch 1, sc in first 2, [sc, hdc] in next, [hdc, sc] in next, sc in next, sl st in next. (8)
Row 7: Ch 1, turn, sk first, sc in next 2, 2 sc in next 2, sc in 2, sl st in last.
Fasten off leaving a long end to sew hat to the top of the snowman.

Optional: Stitch on any letter you wish to the front of the hat.

Stuff hat then sew to the top of snowman, sew in ends.


Monday, November 14, 2016

Free Crochet Pattern: Stash Buster Chunky Throw Blanket


My yarn stash has grown out of control and I've been trying to make good use of all the extra yarn from past projects so today I am sharing with you one of the easiest ways I have found to use up lots of yarn! This pattern calls for holding two strands of worsted weight yarn together (you can also use bulky 6 yarn) to create a thicker yarn. I have used a mix of all sorts of brands, if you are interested in the exact brands and colors I used for both of my example blankets scroll down below the pattern for a detailed list.

Thanks so much for stopping by and reading!
-Jenni


Finished size: Approx. 60" x 45"
                        Note: If you would like your blanket to be wider than 45" simply 
                                 start with a longer beginning chain. You may also want to add 
                                 additional rows to the end of the blanket if you do this.

Difficulty Level: Beginner

Supplies:
Worsted Weight Yarn
      -Each row will use approx. 38 yards total, 19 yards per strand.
      -Your border will use a lot of yarn, approx. 700 yards total.
Size L (8.0mm) Crochet Hook
Tapestry needle
Scissors

Abbreviations (US Terms):
Ch - Chain
Dc - Double Crochet
Sc - Single Crochet
Sl St - Slip Stitch

Important Notes:
-Your first stitch of each row will always be worked in the same space as the ch 1.
-Sew in your ends as you go, you'll thank yourself later if you do this.

Gauge:
7 rows & 13 stitches = 5"


Blanket

Holding 2 strands of worsted weight yarn together:

Row 1: Ch 94, dc in 3rd ch from hook and in each ch across.
Row 2-4: Ch 1, turn. Dc in each across.
Fasten off and join new color with a sl st.

Row 5-6: Ch 1, turn. Dc in each across.
Fasten off and join new color with a sl st.

Row 7-9: Ch 1, turn. Dc in each across.
Fasten off and join new color with a sl st.

Row 10: Row 5-6: Ch 1, turn. Dc in each across.
Fasten off and join new color with a sl st.

Row 11-14: Ch 1, turn. Dc in each across.
Fasten off and join new color with a sl st.

Row 15-16: Ch 1, turn. Dc in each across.
Fasten off and join new color with a sl st.

Row 17-19: Ch 1, turn. Dc in each across.
Fasten off and join new color with a sl st.

Row 20: Row 5-6: Ch 1, turn. Dc in each across.
Fasten off and join new color with a sl st.

Continue to repeat rows 11-20 until you reach 80 rows total.

Fasten off and if you didn't sew in your ends as you went, do so now.


Border

Holding 2 strands of worsted weight yarn together:

Join with a sl st in any space.

Row 1: Ch 1, sc around the edge of the blanket, ch 2 at each corner. Join.

(click to enlarge)

You should have approx. 160 sc down the long sides of the blanket. If you are a few off, that's ok but you don't want much more than 160.

If your edge is not perfectly straight after your first few rows don't worry, it should straighten out by the time you complete all 7 rows. Below is my fall colors throw after row 1 & then again after row 7.


Row 2-7: Ch 1, sc in each around, when you reach each corner space work all of the following into the corner: [sc, ch 2, sc]. Join.

Fasten off after row 7 and sew in ends.


Fall Colors Throw Yarn List
For this blanket I tried a few rows with a bulky 6 yarn and it worked up great next tp the two strands of worsted weight yarn.


Rows 1-4: Red Heart Super Saver, Claret
Rows 5-6: Big Twist Premium, Navy
Rows 7-9: Bernat Softee Chunky, Grey Ragg
Row 10: Red Heart Super Saver, Grey Heather
Row 11-14: I Love This Yarn!, Sungold
Row 15-16: Caron One Pound, Deep Violet
Row 17-19: Lion Brand Vanna's Choice, Dusty Blue
Row 20: Lion Brand Vanna's Choice, Terra Cotta
Row 21-24: I Love This Yarn!, Dark Olive
Row 25-26: Red Heart Super Saver, Claret
Row 27-29: Big Twist Value, Soft Gray
Row 30: Big Twist Premium, Navy
Row 31-34:  I Love This Yarn!, Coffee
Row 35-36: I Love This Yarn!, Key Lime
Row 37-39: Caron One Pound, Deep Violet
Row 40: Bernat Softee Chunky, Grey Ragg
Row 41-44: I Love This Yarn!, Sungold
Row 45-46: Red Heart With Love, Black
Row 47-49: Red Heart Super Saver, Claret
Row 50: Lion Brand Vanna's Choice, Dusty Blue
Row 51-54: I Love This Yarn!, Graphite
Row 55-56: Lion Brand Vanna's Choice, Terra Cotta
Row 57-59: I Love This Yarn!, Coffee
Row 60: Lion Brand Vanna's Choice, Dusty Purple
Row 61-64: Big Twist Premium, Navy
Row 65-66: I Love This Yarn!, Dark Olive
Row 67-69: Bernat Softee Chunky, Grey Ragg
Row 70: Red Heart With Love, Hot Pink
Row 71-74: I Love This Yarn!, Sungold
Row 75-76: Red Heart Super Saver, Claret
Row 77-79: Big Twist Value, Soft Gray
Row 80: Caron One Pound, Deep Violet

Border: Red Heart With Love, Black


Spring Colors Throw Yarn List


Rows 1-4: I Love This Yarn!, Amethyst
Rows 5-6: I Love This Yarn!, Keylime
Rows 7-9: I Love This Yarn!, Stonewash
Row 10: Red Heart With Love, Violet
Row 11-14: Red Heart With Love, Papaya
Row 15-16: I Love This Yarn!, Orchid
Row 17-19: Red Heart With Love, Jadeite
Row 20: Lion Brand Vanna's Choice, Terra Cotta
Row 21-24: Red Heart Super Saver, Delft Blue
Row 25-26: Big Twist Value, Light Rose
Row 27-29: I Love This Yarn!, Amethyst
Row 30: Red Heart With Love, Daffodil
Row 31-34: Red Heart With Love, Hot Pink
Row 35-36: I Love This Yarn!, Turquoise
Row 37-39: Red Heart Super Saver, Dark Orchid
Row 40: Red Heart Super Saver, Light Blue
Row 41-44: Red Heart Super Saver, Tea Leaf
Row 45-46: Caron Simply Soft, Soft Pink
Row 47-49: I Love This Yarn!, Orchid
Row 50: Red Heart With Love, Daffodil
Row 51-54: Red Heart With Love, Papaya
Row 55-56: Red Heart With Love, Jadeite
Row 57-59: I Love This Yarn!, Stonewash
Row 60: Lion Brand Vanna's Choice, Terra Cotta
Row 61-64: I Love This Yarn!, Amethyst
Row 65-66: Big Twist Value, Light Rose
Row 67-69: Lion Brand Vanna's Choice, Colonial Blue
Row 70: Red Heart With Love, Daffodil
Row 71-74: I Love This Yarn!, Turquoise
Row 75-76: Red Heart With Love, Hot Pink
Row 77-79: I Love This Yarn!, Orchid
Row 80: Red Heart Super Saver, Spring Green

Border: Red Heart With Love, White

Thursday, October 27, 2016

Free Crochet Pattern: Women's Vertical Cable Beanie with Slouchy Option

(Shown in Red Heart With Love Pewter & White with White Lion Brand Pom)

Hello crochet friends! A few weeks ago I shared on Instagram a beanie I was working on with a vertical cable and now that it has been tested a few times I am very excited to share the finished pattern with you! Originally I only created the beanie version but I thought it would work great as a slouchy hat too (this is now my fav. slouchy hat!) so I have both options written within the pattern.

(Shown in Big Twist Premium Ivory & Red Heart With Love Black with a Black Lion Brand Pom)

 If you have any questions please feel free to ask. Crochet cables are not the simplest instructions to write out so I've also included a short photo tutorial for the turning rows of the cable.

Thanks so much for stopping by!
-Jenni


Beanie Version              Slouchy Version


Size: Teen/Women's, 21-22" head circumference

Skill Level: Easy/Intermediate

Supplies:
Red Heart With Love Worsted Weight Yarn
Size I (5.5mm) Crochet Hook
Tapestry needle
Scissors
Optional: Lion Brand Pom

Abbreviations (US Terms):
Ch - Chain
Dc - Double Crochet
Fpdc - Front Post Double Crochet
Fptr - Front Post Treble Crochet
Sc - Single Crochet
Sc2tog - Single Crochet 2 Together
Sk - Skip
Sl st - Slip Stitch

Notes:
-Joins are made with sl st.
-Ch 1 does not count as a stitch in the end of row stitch count.
-Gauge: 3.5 dc & 2 rows = 1"

Row 1: Magic circle, ch 1, 11 dc in circle. Join & pull circle tight. (11)
Row 2: Ch 1, 2 dc in same and in each around. Join. (22)
Row 3: Ch 1, 2 dc in same, dc in next. *2 dc in next, dc in next.* Repeat *to* 4 more times. Fpdc around next, dc, fpdc around 6, dc, fpdc around last. Join. (28)
Row 4: Ch 1, 2 dc in same, dc in next. *2 dc in next, dc in next.* Repeat *to* 7 more times. Fpdc around next, dc, fpdc around 6, dc, fpdc. Join. (37)

Note: Photo tutorial for the next 2 rows follows the pattern below, I suggest at least scrolling through the tutorial before moving on if you have never worked  a cable before.

Row 5: Ch 1, 2 dc in same, dc in 2. *2 dc in next, dc in 2.* Repeat *to* 7 more times. Fpdc around next, dc, sk 3, fptr around next 3. Fptr around the 3 skipped, dc, fpdc. Join. (46)
Row 6: Ch 1, 2 dc in same, dc in 3. *2 dc in next, dc in 3.* Repeat *to* 7 more times. Fpdc, 2 dc in next, fpdc around 6, 2 dc in next, fpdc. Join. (57)
Row 7: Ch 1, 2 dc in same, dc in 4. *2 dc in next, dc in 4.* Repeat *to* 7 more times. Fpdc, dc in 2, fpdc around 6, dc in 2, fpdc. Join. (66)
Row 8: Ch 1, 2 dc in same, dc in 52, 2 dc in next. Fpdc, dc in 2, fpdc in 6, dc in 2, fpdc. Join. (68)
Row 9: Ch 1, dc in same and next 55, fpdc, dc in 2, sk 3, fptr around 3, fptr around skipped 3. Dc in 2, fpdc. Join. (68)
Row 10: Ch 1, dc in same and next 55, fpdc, dc in 2, fpdc around 6, dc in 2, fpdc. Join. (68)
Row 11: Repeat row 10.
Row 12: Repeat row 10.

For Beanie: Repeat rows 9-12 2 times, you will end with 20 rows total.
For Slouchy Beanie: Repeat row 9-12 3 times, you will end with 24 rows total.

If you would like a contrasting color for the trim, fasten off and join with your new color in any space.

Final Row: Ch 1, sc2tog, sc in next and in each around. Join. (67)


Row 5 & 6 tutorial

Row 5: Ch 1, 2 dc in same, dc in 2. *2 dc in next, dc in 2.* Repeat *to* 7 more times. Fpdc around next, dc. 

Sk 3, fptr around next 3. 


Fptr around the 3 skipped.


The 6 fptr's will seem smushed up, this is normal and they will straighten out when the next row is worked. 


 Dc in next. 


Fpdc around last, Join. (46)


Row 6: Ch 1, 2 dc in same, dc in 3. *2 dc in next, dc in 3.* Repeat *to* 7 more times. Fpdc, 2 dc in next. 

Fpdc around 6.


2 dc in next, fpdc. Join. (57)


I hope this short photo tutorial was of some help, if you still need help you can message me on facebook, email (byjennidesigns@gmail.com) me or leave a comment here. 

Free Crochet Pattern: Women's Quick Chunky Cat Hat


Are you in need of a last minute Halloween costume idea? You can whip up this chunky hat in no time at all, tuck a thin feather boa into a pair of black pants for a cat tail and use a little make-up for a nose and whiskers you have a quick, easy & inexpensive Halloween costume! I'd love to see your finished projects, if you would like to share feel free to upload your photos to my facebook page here: www.facebook.com/byjennidesigns or add this pattern to your projects on Ravelry! 

Thanks for stopping by & reading!
-Jenni


Difficulty Level: Easy

Size: Teen/Women’s

Supplies:
Bernat Softee Chunky Yarn, Super Bulky (6)
   100-125 yards for hat & outside of ears
   10 yards for inside of ears
Size N (9.0 mm) Crochet Hook
Tapestry Needle
Scissors Stitch

Abbreviations (US Terms):
Ch – Chain
Dc – Double Crochet
Hdc – Half Double Crochet
Hdc2tog - Half Double Crochet 2 Together
Sc – Single Crochet
Sk – Skip
Sl St – Slip Stitch

Pattern for gauge:
Row 1: Ch 11, dc in 3rd ch from hook and in each across.
Row 2: Ch 2, turn. Dc in same and in each across.

Piece should measure approximately 4” x 2” for gauge. If not, please adjust your tension or hook size to get gauge. Gauge is important for this hat pattern.

Important Notes:
-Ch 2's & ch 1's do not count as stitch and are not included in the stitch count at the end of each row.
-Joins are made with sl st to the first dc, do not join to the ch 2.

Hat 

Row 1: Magic circle, ch 2, 10 dc in circle. Join & pull circle tight. (10)
Row 2: Ch 1, 2 hdc in same and in each around. Join. (20)
Row 3: Ch 2, dc in same, 2 dc in next. *Dc in next, 2 dc in next.* Repeat *to* around. Join. (30)
Row 4: Ch 1, 2 hdc in same, hdc in 2. *2 hdc in next, hdc in 2.* Repeat *to* around. Join. (40)

Your circle should measure approx. 5.5” across the center.

Row 5: Ch 2, 2 dc in same, dc in next and in each around. Join. (41)
Row 6: Ch 1, 2 hdc in same, hdc in next and in each around. Join. (42)
Row 7: Ch 2, dc in same and in each around. Join. (42)
Row 8: Ch 1, hdc in same and in each around. Join. (42)
Row 9: Ch 2, dc in same and in each around. Join. (42)
Row 10: Ch 1, hdc in same and in each around. Join. (42)
Row 11: Ch 2, dc in same and in each around. Join. (42)
Row 12: Ch 1, hdc in same and in each around. Join. (42)
Row 13-14: Ch 1, sc in same and in each around. Join. (42)

Fasten off and sew in ends.

Ears
(Make 4, 2 outside ears & 2 inside)

Row 1: Ch 7, hdc in 2nd ch from hook and in each across. Ch 1, turn. (6)
Row 2: Hdc2tog, hdc in 2, hdc2tog. Ch 1, turn. (4)
Row 3: Hdc in each across. Ch 1, turn. (4)
Row 4: Hdc2tog, hdc2tog. Ch 1, turn. (2)
Row 5: Hdc in each across. Ch 1, turn. (2)
Row 6: Hdc2tog. Fasten off. (1)

Fasten off. 

To complete the ears you now need to hold together one outside ear to one inside ear, like so:


Using the outside ear color, join with a sl st in the lower right corner of the ear, ch 1. Work a sc in the same space as the ch 1.


Continue to sc across this side of the ear until you reach the point of the ear. When you reach the point, work all of the following stitches into the same space: [sc, ch 2, sc]. Then proceed to sc down the left side of the ear. There is no need to sc along the bottom of the ear. Fasten off leaving a long end for sewing.


Repeat for the 2nd ear. 

Sew ears onto hat and sew in all your ends and you're done! 


I hope you have a very Happy Halloween!

Tuesday, July 19, 2016

Free Crochet Pattern Tutorial: Deer Head Applique

(Shown in 
(top row) Caron Simply Soft Pink, Hobby Lobby I Love this Yarn Orange Neon, Caron Simply Soft Blue
(bottom row) Red Heart Super Saver Coffee, Cafe Latte, Red Black & Deborah Norville Oak Moss)

I’ve made quite a few of these appliques for hats but they would also be adorable on a blanket, pillow or even a sweater! You may use just about any worsted weight yarn you would like for this project! Following the pattern is a full photo tutorial, I suggest scrolling through the photo tutorial before getting started.

Thanks for stopping by! 
-Jenni


Skill Level: Easy

Finished size (with gauge): 3 ½” in height and 2 ½” in width

Supplies:
Size G (4.0mm) Crochet Hook
Worsted Weight Yarn, approx. 6-8 yards
Tapestry needle
Scissors

Stitch Abbreviations (U.S. Terms):
Ch – Chain
Sc – Single Crochet
Sc2tog – Single Crochet 2 together
Sc3tog – Single Crochet 3 together
Sl st – Slip Stitch

Stitch Explanation:
Sc2tog – Insert hook in first stitch, yarn over, pull up loop (2 loops on hook). Insert hook into next stitch, yarn over, pull up loop (3 loops on hook). Yarn over and pull through all 3 loops.
Sc3tog – Insert hook in first stitch, yarn over, pull up loop (2 loops on hook). Insert hook into next stitch, yarn over, pull up loop (3 loops on hook). Insert hook into next stitch, yarn over, pull up loop (4 loops on hook). Yarn over and pull through all 4 loops.

Gauge:
6 sc and 3 rows = 1”

Head

Row 1: Ch 12, sc in 2nd ch from hook and in each across. Ch 1. (11 sc)

Rotate piece to the right so you can work on the opposite side of the foundation ch.

Row 2: Sl st in 3, ch 1, sc in next and 4 more. Leave last 3 stitches unworked. Ch 1. (5 sc)
Row 3: Sc in first and in each across. Ch 1, turn. (5 sc)
Row 4: 2 Sc in first, sc in 3, 2 sc in last. Ch 1, turn. (7 sc)
Row 5: 2 Sc in first, sc in 5, 2 sc in last. Ch 1, turn. (9 sc)
Row 6: Sc2tog, sc in 5, sc2tog. Ch 1, turn. (2 sc2tog, 5 sc)
Row 7: Sc2tog, sc in 3, sc2tog. Ch 1, turn. (2 sc2tog, 3 sc)
Row 8: Sc in first and in each across. Ch 1, turn. (5 sc)
Row 9: Sc2tog, sc in 1, sc2tog. Ch 1, turn. (2 sc2tog, 1 sc)
Row 10: Sc3tog.

Do NOT turn piece, rotate piece to the right. Ch 1 and sc along the side until you get to the corner by the ear. Sl st in corner, sc in next and in each across, you should have 3 sc.

Ch 2, continue rotating piece to the right as you work around. Now you will be working on the opposite side of ear, sl st in first open stitch. Sc in next and in 9 more (10 sc total).

Sl st in last, ch 2. Continue rotating piece and you will now be working under the 2nd ear. Sl st across and in corner space (4 sl st total).

Now sc around the last side and join with sl st to first sc.
Fasten off leaving long end if sewing to another article.

Antlers

You will now be joining yarn to the top of the head to start the antlers. Join with a sl st in the 5th stitch from the right (on top of the head). Ch 7, sc in 2nd ch from hook and in 3 more. Ch 4, sc in 2nd from ch from hook and in 2 more. Sc into next open ch on original ch 7, sc in next. Sl st into next open stitch on head, sl st one more.

Ch 6, sc in 2nd ch from hook and in 2 more. Ch 5, sc in 2nd ch from hook and in 3 more. Sc into next open ch on original ch 6, sc in next. Sl st into next open stitch on head and fasten off, if you have made the antlers a different color than the head be sure to leave the end long enough for the purpose of sewing the applique on to another article.

Nose 
(optional)

Magic Circle, Ch 1, 6 sc. Join, fasten off leaving long enough end for sewing.


Photo Tutorial 

Head 

Row 1: Ch 12, sc in 2nd ch from hook and in each across. Ch 1. (11 sc)

(click image to enlarge)

Rotate piece to the right so you can work on the opposite side of foundation ch.
 Row 2: Sl st in 3, ch 1, sc in next and 4 more. Leave last 3 stitches unworked. Ch 1. (5 sc) 


Turn Piece. 
Row 3: Sc in first and in each across. Ch 1. (5 sc) 


 Turn piece. 
Row 4: 2 Sc in first, sc in 3, 2 sc in last. Ch 1. (7 sc) 


 Turn piece. 
Row 5: 2 Sc in first, sc in 5, 2 sc in last. Ch 1. (9 sc) 


 Turn piece. 
Row 6: Sc2tog, sc in 5, sc2tog. Ch 1. (2 sc2tog, 5 sc) 


 Turn piece. 
Row 7: Sc2tog, sc in 3, sc2tog. Ch 1. (2 sc2tog, 3 sc) 


 Turn piece. 
Row 8: Sc in first and in each across. Ch 1. (5 sc) 


 Turn piece. 
Row 9: Sc2tog, sc in 1, sc2tog. Ch 1. (2 sc2tog, 1 sc) 


 Turn piece. 
Row 10: Sc3tog.


Do NOT turn piece. 
 Ch 1 and sc along the side until you get to the corner by the ear. 
Sl st in corner, sc in next and in each across, you should have 3 sc. 


Ch 2, continue rotating piece to the right. 
Now you will be working on the opposite side of ear, sl st in first open stitch.


 Sc in next and in 9 more (10 sc total). 
 Sl st in last, ch 2. 


Continue rotating piece and you will now be working under the 2nd ear. 
 Sl st across and in corner space (4 sl st total). 


 Now sc around the last side and join with sl st to first sc. 
 Fasten off leaving a long end if sewing on to another piece. 


 Antlers 

Holding head piece right side up; join with a sl st in the 5th stitch from the right. 


Ch 7. 


 Rotate piece to the right and sc in 2nd ch from hook, sc in 3 more. 


 Ch 4.  


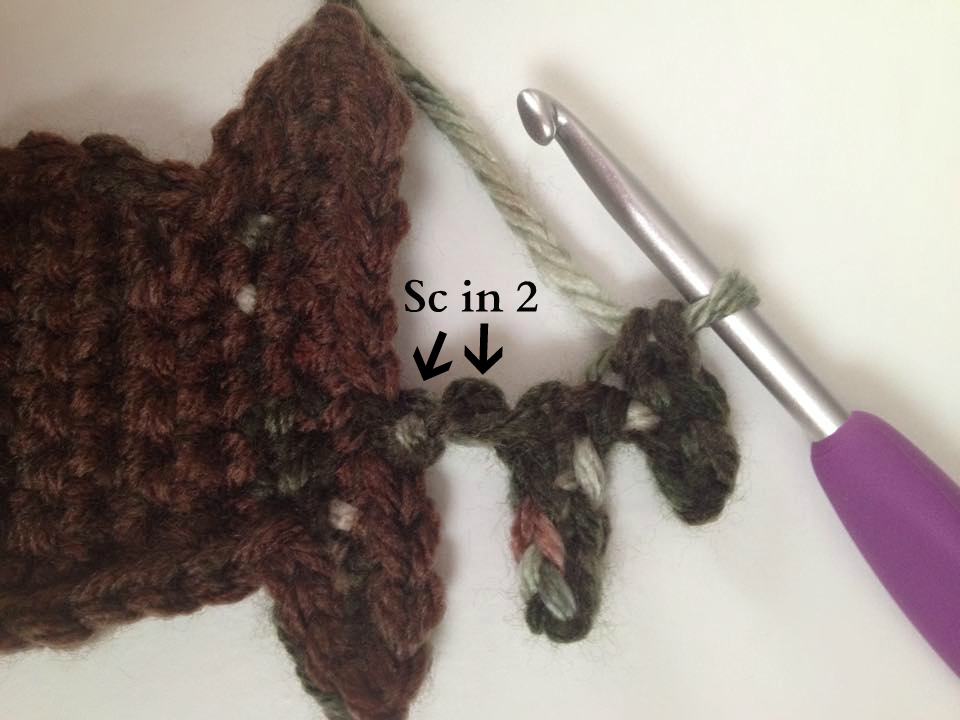
Sc in 2nd from ch from hook and in 2 more. 


 Sc into next open ch on original ch 7. Sc in next. 


 Sl st into next open stitch on head, sl st in one more. 


 Ch 6.


Sc in 2nd ch from hook, sc in 2 more. 


 Ch 5. 


 Sc in 2nd ch from hook and in 3 more. 


 Sc into next open ch on original ch 6. Sc in next. 


 Sl st into next open stitch on head and fasten off. 
If you have made the antlers a different color than the head be sure to leave one of these ends long for the purpose of sewing the applique on to another article.


Below are are few examples of how I have put this applique to use, I'd love to see how you have used this pattern! Feel free to share on facebook @ www.facebook.com/byjennidesigns or Ravelry @ www.ravelry.com/patterns/library/deer-head-applique