Disclosure:

I am a participant in the Amazon Services LLC Associates Program, an affiliate advertising program designed to provide a means for me to earn fees by linking to Amazon.com and affiliated sites.
Showing posts with label afghan. Show all posts

Wednesday, August 3, 2022

Free Crochet Pattern: All My Love Heart Square Baby Blanket


Hello crochet friends! 
It's been a while since I have posted a new pattern but I have a really great one to share that I have been working on for the last few months. My sweet god daughter is having her first baby this coming fall and I wanted to crochet her a special blanket for the new little one. She has requested a neutral/woodsy colors/theme so I picked a few really great tans, browns & off whites for her blanket, I'll list them below under the supplies section.

I have a video tutorial for this pattern (currently uploading) on my YouTube channel so if you feel stuck or confused at any part you can check that out. My written pattern is for the heart square and my example blanket is baby size but you can very easily make more squares and have a blanket as big as you wish!

Thanks so much for stopping by, happy crocheting!
Jenni


Difficulty: Intermediate 

Size: Square: approx. 6.75" x 7"
         Finished Baby Blanket (with border): approx. 35" x 37"   

Supplies:  
Worsted Weight Yarn, 2 colors per square, 32 yards of each color
                                    For Baby Blanket Border, 225-250 yards
            
                                    Colors used in example: 
                                    Red Heart Super Saver: Aran, Buff, Cafe, CoffeeAran Fleck
                                                                           Buff Fleck, Oatmeal
                                    Vanna's Choice: Barley, Off-White
                                     I Love This Yarn!: Desert Dust

Abbreviations (US terms)
BLO - Back Loop Only 
C1 - Color 1
C2 - Color 2
Ch - Chain
Dc - Double Crochet
Sc - Single Crochet 
Ss - Slip Stitch 
St - Stitch 

Important Notes
-Color changing and carrying the yarn is used for this pattern, if you haven't worked a pattern with color changing/carrying I suggest you check out my tutorial above, skip to 00:05:15 timestamp.
-Gauge is not important for this pattern unless you want the exact same size as I have listed above, in that case, my gauge is: 5 sc x 4 rows = 1" 


Heart Square 
(make 25 for baby blanket size)

Starting with C1:
Row 1: Ch 30, sc in 2nd ch from hook and in each remaining ch across. Ch 1, turn. (29) 
Row 2: Sc in each st across. Ch 1, turn. (29) 

The next row begins our color changing and carrying. I will be listing in order how many sc should be worked for each color. Remember, C1 = Color 1 (outside of the heart color) & C2 = Color 2 (heart color). 

If you need help with the color changing/carrying, you can watch the tutorial and skip to 00:05:15 timestamp.

Row 3: C1: 14 sc, C2: 1 sc, C1: 14 sc. Ch 1, turn. (29)
Row 4: C1: 13 sc, C2: 3 sc, C1: 13 sc. Ch 1, turn. (29)
Row 5: C1: 12 sc, C2: 5 sc, C1: 12 sc. Ch 1, turn. (29)
Row 6: C1: 11 sc, C2: 7 sc, C1: 11 sc. Ch 1, turn. (29)
Row 7: C1: 10 sc, C2: 9 sc, C1: 10 sc. Ch 1, turn. (29)
Row 8: C1: 9 sc, C2: 11 sc, C1: 9 sc. Ch 1, turn. (29)
Row 9: C1: 8 sc, C2: 13 sc, C1: 8 sc. Ch 1, turn. (29)
Row 10: C1: 7 sc, C2: 15 sc, C1: 7 sc. Ch 1, turn. (29)
Row 11: C1: 6 sc, C2: 17 sc, C1: 6 sc. Ch 1, turn. (29)
Row 12: C1: 5 sc, C2: 19 sc, C1: 5 sc. Ch 1, turn. (29)
Row 13: C1: 4 sc, C2: 21 sc, C1: 4 sc. Ch 1, turn. (29)
Row 14: C1: 3 sc, C2: 23 sc, C1: 3 sc. Ch 1, turn. (29)
Row 15: C1: 2 sc, C2: 25 sc, C1: 2 sc. Ch 1, turn. (29)

Repeat row 15 until you have 22 rows completed, then move on to row 23 below. 

Row 23: C1: 3 sc, C2: 11 sc, C1: 1 sc, C2: 11 sc, C1: 3 sc. Ch 1, turn. (29)
Row 24: C1: 4 sc, C2: 9 sc, C1: 3 sc, C2: 9 sc, C1: 4 sc. Ch 1, turn. (29)
Row 25: C1: 5 sc, C2: 7 sc, C1: 5 sc, C2: 7 sc, C1: 5 sc. Ch 1, turn. (29)
Row 26: C1: 6 sc, C2: 5 sc, C1: 7 sc, C2: 5 sc, C1: 6 sc. Ch 1, turn. (29)
Row 27: C1: 7 sc, C2: 3 sc, C1: 9 sc, C2: 3 sc, C1: 7 sc. Ch 1, turn. (29)

After row 27 you can cut the C2 yarn end. 

Row 28: Sc in each st across. Ch 1, turn.
Row 29: Sc in each st across. 

After row 29 you will need to make a sc border around the entire square.

Row 30
: Ch 1, turn. *Sc in each st across. When you reach the end of the row, ch 2 & rotate to work along next edge.* Repeat from *to* 3 additional times then join with a ss to the first sc you made of the edge. 

Fasten off & sew in your ends.

Joining Squares 

After you have completed your 25 squares you will need to join them in your desired arrangement. To join your squares lay them with the faces touching and ss the squares together using the sc edge. You can do this by working through both loops or use just the outside loops on each square. I suggest viewing the video tutorial for this part of the pattern, you can skip ahead to about the 00:59:00 timestamp where I show examples of both joins.


Ruffle Border


For the border there is not an exact stitch count, this is unimportant but I still went ahead and listed a rough count for each row.  

Row 1: Join in any st with a ss. Ch 1, *Sc in each st across. When you reach the corner, ch 2 & rotate to work along next edge.* Repeat from *to* 3 additional times then join with a ss to the first sc you made of the border. (roughly 151-155 per edge, 604-620 total)
Row 2: In BLO: Ch 1, 2 dc into each st around. Also work 2 dc into each chain on the corners using the BLO.  (roughly 302-310 per edge, 1208-1240 total)

Fasten off and sew in ends.


Monday, November 14, 2016

Free Crochet Pattern: Stash Buster Chunky Throw Blanket


My yarn stash has grown out of control and I've been trying to make good use of all the extra yarn from past projects so today I am sharing with you one of the easiest ways I have found to use up lots of yarn! This pattern calls for holding two strands of worsted weight yarn together (you can also use bulky 6 yarn) to create a thicker yarn. I have used a mix of all sorts of brands, if you are interested in the exact brands and colors I used for both of my example blankets scroll down below the pattern for a detailed list.

Thanks so much for stopping by and reading!
-Jenni


Finished size: Approx. 60" x 45"
                        Note: If you would like your blanket to be wider than 45" simply 
                                 start with a longer beginning chain. You may also want to add 
                                 additional rows to the end of the blanket if you do this.

Difficulty Level: Beginner

Supplies:
Worsted Weight Yarn
      -Each row will use approx. 38 yards total, 19 yards per strand.
      -Your border will use a lot of yarn, approx. 700 yards total.
Size L (8.0mm) Crochet Hook
Tapestry needle
Scissors

Abbreviations (US Terms):
Ch - Chain
Dc - Double Crochet
Sc - Single Crochet
Sl St - Slip Stitch

Important Notes:
-Your first stitch of each row will always be worked in the same space as the ch 1.
-Sew in your ends as you go, you'll thank yourself later if you do this.

Gauge:
7 rows & 13 stitches = 5"


Blanket

Holding 2 strands of worsted weight yarn together:

Row 1: Ch 94, dc in 3rd ch from hook and in each ch across.
Row 2-4: Ch 1, turn. Dc in each across.
Fasten off and join new color with a sl st.

Row 5-6: Ch 1, turn. Dc in each across.
Fasten off and join new color with a sl st.

Row 7-9: Ch 1, turn. Dc in each across.
Fasten off and join new color with a sl st.

Row 10: Row 5-6: Ch 1, turn. Dc in each across.
Fasten off and join new color with a sl st.

Row 11-14: Ch 1, turn. Dc in each across.
Fasten off and join new color with a sl st.

Row 15-16: Ch 1, turn. Dc in each across.
Fasten off and join new color with a sl st.

Row 17-19: Ch 1, turn. Dc in each across.
Fasten off and join new color with a sl st.

Row 20: Row 5-6: Ch 1, turn. Dc in each across.
Fasten off and join new color with a sl st.

Continue to repeat rows 11-20 until you reach 80 rows total.

Fasten off and if you didn't sew in your ends as you went, do so now.


Border

Holding 2 strands of worsted weight yarn together:

Join with a sl st in any space.

Row 1: Ch 1, sc around the edge of the blanket, ch 2 at each corner. Join.

(click to enlarge)

You should have approx. 160 sc down the long sides of the blanket. If you are a few off, that's ok but you don't want much more than 160.

If your edge is not perfectly straight after your first few rows don't worry, it should straighten out by the time you complete all 7 rows. Below is my fall colors throw after row 1 & then again after row 7.


Row 2-7: Ch 1, sc in each around, when you reach each corner space work all of the following into the corner: [sc, ch 2, sc]. Join.

Fasten off after row 7 and sew in ends.


Fall Colors Throw Yarn List
For this blanket I tried a few rows with a bulky 6 yarn and it worked up great next tp the two strands of worsted weight yarn.


Rows 1-4: Red Heart Super Saver, Claret
Rows 5-6: Big Twist Premium, Navy
Rows 7-9: Bernat Softee Chunky, Grey Ragg
Row 10: Red Heart Super Saver, Grey Heather
Row 11-14: I Love This Yarn!, Sungold
Row 15-16: Caron One Pound, Deep Violet
Row 17-19: Lion Brand Vanna's Choice, Dusty Blue
Row 20: Lion Brand Vanna's Choice, Terra Cotta
Row 21-24: I Love This Yarn!, Dark Olive
Row 25-26: Red Heart Super Saver, Claret
Row 27-29: Big Twist Value, Soft Gray
Row 30: Big Twist Premium, Navy
Row 31-34:  I Love This Yarn!, Coffee
Row 35-36: I Love This Yarn!, Key Lime
Row 37-39: Caron One Pound, Deep Violet
Row 40: Bernat Softee Chunky, Grey Ragg
Row 41-44: I Love This Yarn!, Sungold
Row 45-46: Red Heart With Love, Black
Row 47-49: Red Heart Super Saver, Claret
Row 50: Lion Brand Vanna's Choice, Dusty Blue
Row 51-54: I Love This Yarn!, Graphite
Row 55-56: Lion Brand Vanna's Choice, Terra Cotta
Row 57-59: I Love This Yarn!, Coffee
Row 60: Lion Brand Vanna's Choice, Dusty Purple
Row 61-64: Big Twist Premium, Navy
Row 65-66: I Love This Yarn!, Dark Olive
Row 67-69: Bernat Softee Chunky, Grey Ragg
Row 70: Red Heart With Love, Hot Pink
Row 71-74: I Love This Yarn!, Sungold
Row 75-76: Red Heart Super Saver, Claret
Row 77-79: Big Twist Value, Soft Gray
Row 80: Caron One Pound, Deep Violet

Border: Red Heart With Love, Black


Spring Colors Throw Yarn List


Rows 1-4: I Love This Yarn!, Amethyst
Rows 5-6: I Love This Yarn!, Keylime
Rows 7-9: I Love This Yarn!, Stonewash
Row 10: Red Heart With Love, Violet
Row 11-14: Red Heart With Love, Papaya
Row 15-16: I Love This Yarn!, Orchid
Row 17-19: Red Heart With Love, Jadeite
Row 20: Lion Brand Vanna's Choice, Terra Cotta
Row 21-24: Red Heart Super Saver, Delft Blue
Row 25-26: Big Twist Value, Light Rose
Row 27-29: I Love This Yarn!, Amethyst
Row 30: Red Heart With Love, Daffodil
Row 31-34: Red Heart With Love, Hot Pink
Row 35-36: I Love This Yarn!, Turquoise
Row 37-39: Red Heart Super Saver, Dark Orchid
Row 40: Red Heart Super Saver, Light Blue
Row 41-44: Red Heart Super Saver, Tea Leaf
Row 45-46: Caron Simply Soft, Soft Pink
Row 47-49: I Love This Yarn!, Orchid
Row 50: Red Heart With Love, Daffodil
Row 51-54: Red Heart With Love, Papaya
Row 55-56: Red Heart With Love, Jadeite
Row 57-59: I Love This Yarn!, Stonewash
Row 60: Lion Brand Vanna's Choice, Terra Cotta
Row 61-64: I Love This Yarn!, Amethyst
Row 65-66: Big Twist Value, Light Rose
Row 67-69: Lion Brand Vanna's Choice, Colonial Blue
Row 70: Red Heart With Love, Daffodil
Row 71-74: I Love This Yarn!, Turquoise
Row 75-76: Red Heart With Love, Hot Pink
Row 77-79: I Love This Yarn!, Orchid
Row 80: Red Heart Super Saver, Spring Green

Border: Red Heart With Love, White

Tuesday, April 12, 2016

Free Crochet Pattern Tutorial: Granny Square

(Shown in Red Heart Super Saver Glow Worm, Red Heart With Love Hot Pink & Daffodil)

I've been trying to use up lots of odds & ends from my yarn collection and granny squares are just perfect for that! I made a fun little flipogram a couple weeks ago on Instagram for a granny square and thought I would write up a tutorial here. For my squares I am using a size J hook & worsted weight yarn (red heart with love is my favorite for this project) but you can use any yarn for this project, just adjust your hook size to the recommended hook size on your yarn label. 


Skill Level: Beginner/Easy

Finished Size: 9" x 9"

Supplies:
Worsted Weight Yarn, approx. 100 yd. per 9 row square
Size J (6.0 mm) Crochet Hook
Tapestry Needle
Scissors

Abbreviations (US Terms):
Ch - Chain
Dc -Double Crochet
Sk - Skip
Sl st - Slip Stitch
Sp - Space

Gauge: Each dc cluster should measure approx. 3/4"

Important Notes:
-3 dc = dc cluster
-All joins are made with a sl st.
-These brackets [ ] indicate a group of stitches that all need to be worked in the same space.
-The beginning Ch 2 of each row counts as a dc.
-This pattern uses the magic circle, you can find a short tutorial here if you do not already know how to make a magic circle: https://www.youtube.com/watch?v=64O9WVJucFA


Row 1: Magic circle, ch 2, 2 dc in circle, ch 2. 


(click images to enlarge)

*3 dc in circle, ch 2.* Repeat *to* 2 more times.


Pull circle tight and join. (12 dc)


Row 2: Sl st over next sp, sl st into ch sp. 


[Ch 2, 2 dc, ch 2, 3 dc] all in ch 2 space. 


*Sk 3 dc, in next ch sp: [3 dc, ch 2, 3dc].* Repeat *to* 2 more times. Join. (24 dc)


Row 3: Sl st over next sp, sl st into ch sp. 


[Ch 2, 2 dc, ch 2, 3 dc] all in ch 2 space. 


Sk 3 dc, 3 dc between dc clusters.


*Sk 3 dc, [3 dc, ch 2, 3dc] all in next ch 2 sp. Sk 3 dc, 3 dc between dc clusters.* Repeat *to* 2 more times. Join. (36 dc)


3 rows completed. 

Now, you can continue on for as many rows as you would like, working
[3 dc, ch 2, 3 dc] in each corner space & working 3 dc between each dc clusters.

You can even continue on to blanket size! I've made many blankets with a simple granny square for the base. For a super easy edge just sc around in each dc and work [3 sc, ch 2, 3 sc] into each corner space!

Below is a baby blanket size granny square I crocheted a while ago, changing colors after 2 rows and using Vanna's Choice worsted weight yarn in Colonial Blue, Kelly Green & Silver Grey.

Wednesday, March 4, 2015

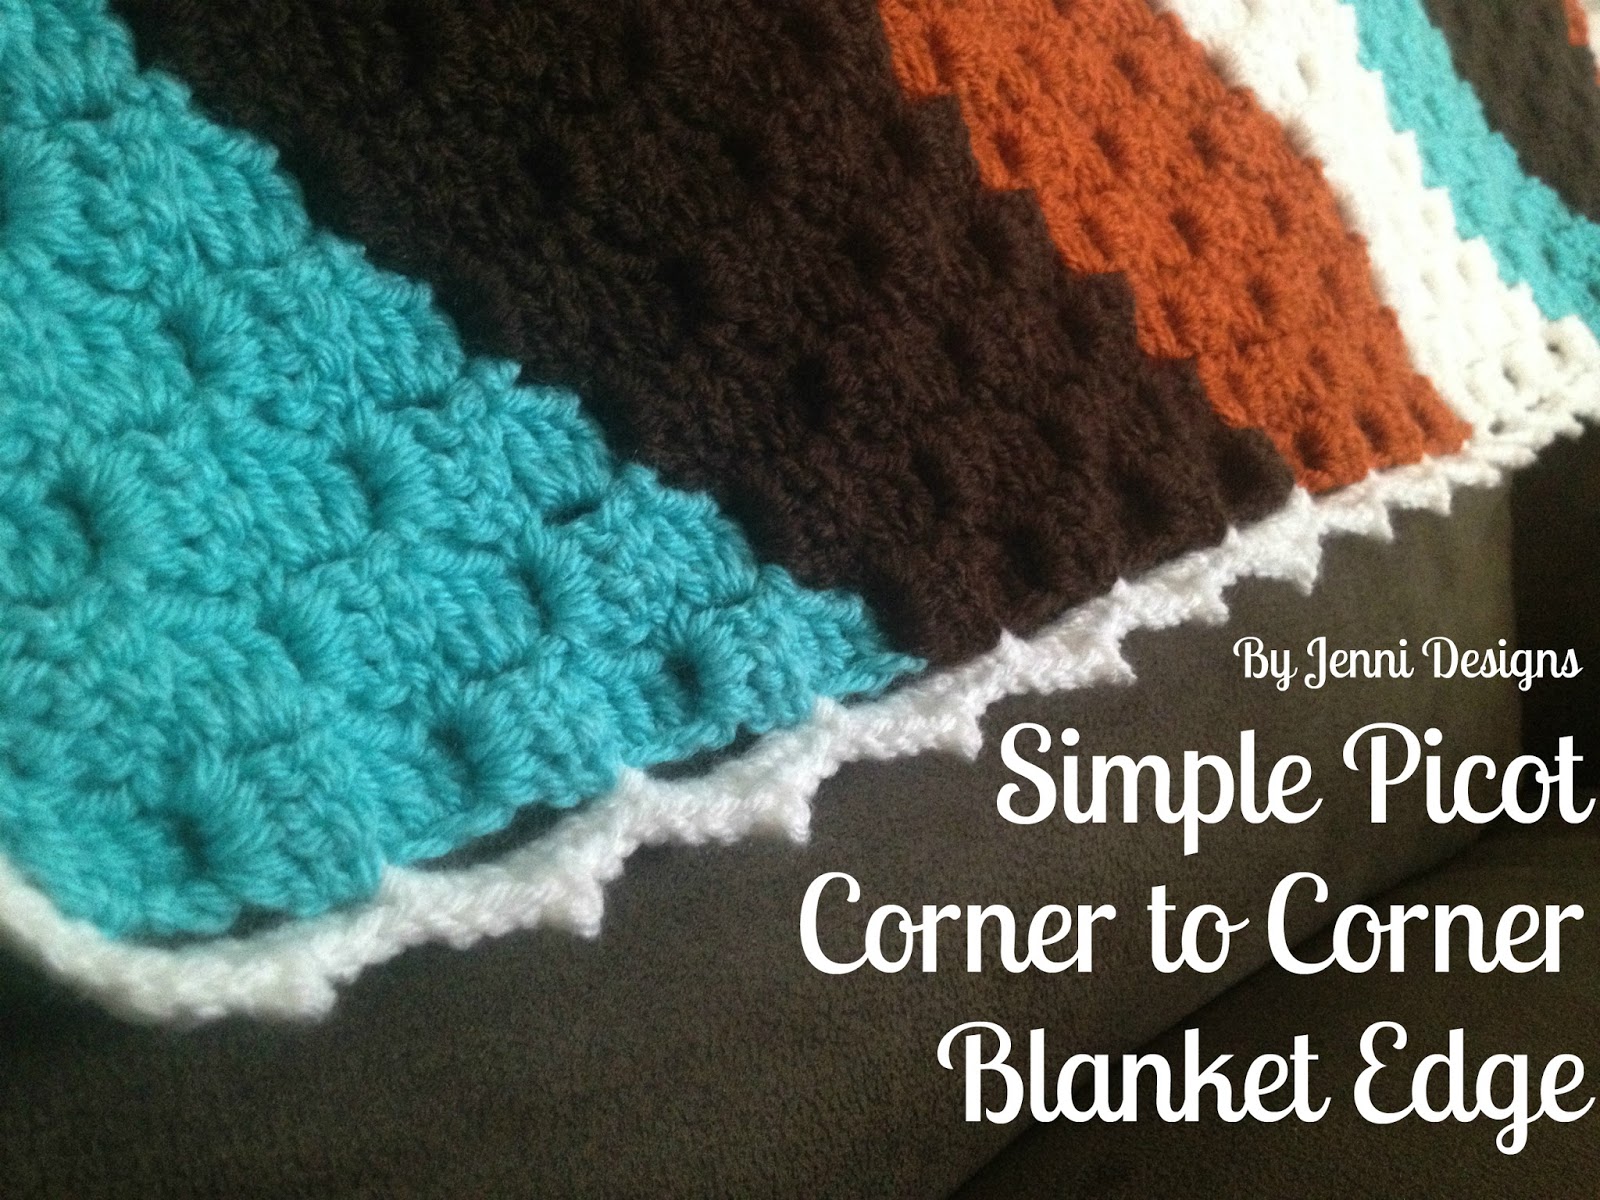
Free Crochet Pattern: Simple Picot Corner to Corner Blanket Edge

(Shown in Hobby Lobby I Love This Yarn! Turquoise, Brown, White & Burnt Pumpkin)

I have made quiet a few corner to corner blankets and have used a variety of edges for them, I usually just do whatever I please without writing it down but thought maybe I'll start sharing here because I often get asked how I created my edge.

For my corner to corner blanket shown I used a size I Hook and this free pattern: Red Heart Corner to Corner Throw.

Thanks for stopping by and reading! 
-Jenni


Skill Level: Easy

Supplies:
Worsted Weight Yarn
Size I (5.5mm) Crochet Hook
Size G (4.0mm) Crochet Hook
Tapestry Needle
Scissors

Abbreviations (US Terms):
Ch - Chain
Hdc - Half Double Crochet
Sc - Single Crochet
Sk - Skip
Sl St - Slip Stitch
Sp - Space

Notes:
-Stitches places between these brackets [ ] indicate a group of stitches to all be worked into the same space.
-Picot = Ch 2, sl st to top of hdc.

(click to view larger)

-1 block = 1 group of 3 dc's.


After you have completed your Corner to Corner Blanket:

With Hook size I:
Row 1: Join with sl st at any corner, *Ch 5, sk 2 blocks, sl st between blocks* Repeat *to* around edge, ch 1 at each corner.

Switch to Hook size G:

Important: In the next row ch 2 at each corner.

Row 2: Sl st into first ch 5 sp, ch 1, [sc, 3 hdc, picot, 2 hdc, sc]. *Sc into next ch 5 sp and work the following in the same space: [3 hdc, picot, 2 hdc, sc].* Join with sl st to first sc. Fasten off and sew in ends.