(for yarn color info. scroll to the bottom of this post)
This army tank applique was created for my son who loves all things army. After creating it, it received his seal of approval! You can change up this little applique many ways and use almost any yarn you would like for it. Following the written pattern is a photo tutorial, I suggest scrolling through the photo tutorial before starting the pattern.
Thanks for stopping by!
-Jenni Catavu
Skill Level: Easy/Intermediate
Finished size: (with gauge): 4” x 2 ¼”
Supplies:
15-20 yards of worsted weight yarn in choice of 3 colors (I recommend Red Heart With Love or Hobby Lobby I Love This Yarn)
-C1 = Track Color (tutorial shows grey)
-C2 = Body Color (tutorial shows green)
-C3 = Tire Color (tutorial shows black)
Size F (3.75 mm) Crochet Hook
Tapestry Needle
Stitch Marker
Scissors
Stitch Abbreviations (US Terms):
BLO – Back Loop Only
Ch – Chain
Dc – Double Crochet
FLO – Front Loop Only
Hdc – Half Double Crochet
RS – Right Side
Sc – Single Crochet
Sk – Skip
Sl St – Slip Stitch
Sp – Space
Important Notes:
-Joins are made with sl st.
-Ch 1 does NOT count as a stitch.
-This pattern uses the magic circle (aka magic ring), if you don't know how to make one you can learn with my short video here:
https://www.youtube.com/watch?v=64O9WVJucFA
Gauge:
5 sc and 4 rows = 1”
Pattern for gauge:
Row 1: Ch 6, sc in 2nd ch from hook and in each across. Ch 1, turn. (5 sc)
Row 2-3: Sc in same and in each across. Ch 1, turn. (5 sc)
Row 4: Sc in same and in each across. (5 sc)
Piece should measure 1” x 1”, gauge is not extremely important for this pattern unless you want your applique to be the finished size listed (4” x 2 ¼”).
Track
With C1:
Row 1: Ch 14, sc in 2nd ch from hook and in each across. Ch 1, turn. (13 sc)
Row 2: Sc in same and in each across. Ch 1, turn. (13 sc)
After turning; place a stitch marker in the back loop of the first space. You will be working in the BLO later and will be starting the row in this back loop.
Row 3: In FLO: Sc in same, ch 2, sl st to top of sc. *Sc in next 3, ch 2, sl st to top of sc.* Repeat *to* across (5 spikes made). Sl st in same sp as last sc.
Working in both loops now:
Rotate piece to the right so you can work along the side of rows 1-3. Sl st once so you are at about the middle. In the same sp: [Ch 1, sc, sl st], sl st in next. This sl st is also in the same sp you will be working in for the next group of stitches after rotating piece.
Rotate piece to the right and in the first sp: [Ch 1, sc, ch 2, sl st to top of sc]. *Sc in next 3, ch 2, sl st to top of sc.* Repeat *to* across (5 spikes made). Sl st in same sp as last sc.
Rotate piece to the right and work along the side of rows 1-3. Sl st once so you are at about the middle. In the same sp: [Ch 1, sc, sl st], sl st in next. Fasten off leaving a long end for sewing.
Note: The side facing you currently is the RS.
Body
With C2:
With RS facing you, join with a sl st in the space that was indicated to place a stitch marker in row 3 of the track. You can now remove the stitch marker.
Row 1: In BLO: Ch 1, dc in same and in each BLO across. Ch 1, turn. (13 dc)
Row 2: Dc in same and in each across. Turn. (13 dc)
Row 3: Sk 1st sp, sl st in next 3, sk 2, 6 dc in next, sk 2, sl st in next and 3 more.
Rotate piece to the right so you can work on the side of rows 1-2. Ch 1, sl st twice down the side, this should bring you to about the middle. Ch 8, hdc in 2nd ch from hook and in each across (7 hdc total), sl st in the same sp that your chain began in. Fasten off leaving long end for sewing.
Tires (make 3):
Or use 3 (15 mm) buttons.
With C3:
Magic Circle (or ch 3, join), ch 1, 6 sc in circle. Pull circle tight, join. Fasten off & sew on to track.
Optional: Stitch on a little star to the tank or sew on a small 7mm star button.
If sewing on to another piece:
Use your tapestry needle and sew down starting with the end indicated to leave long on the track. Sew through each spike. Next use the other end indicated to leave long and sew around the entire body of the tank starting with the gun. Sew in ends.
PHOTO TUTORIAL
Track
With C1:
Row 1: Ch 14, sc in 2nd ch from hook and in each across.
(click images to enlarge)
Ch 1, turn.
Row 2: Sc in same and in each across.
Ch 1, turn.
After turning; place a stitch marker in the back loop of the first space. You will be working in the BLO later and will be starting the row in this back loop.
Row 3: In FLO: Sc in same, ch 2.
Sl st to top of sc.
Continue to work this entire row in FLO.
*Sc in next 3, ch 2, sl st to top of sc.* Repeat *to* across. Sl st in same sp as last sc.
Rotate piece to the right so you can work along the side of rows 1-3.
Working in both loops now:
Sl st once so you are at about the middle.
In the same sp: [Ch 1, sc, sl st]
Sl st in next.
This sl st is also in the same sp you will be working in for the next group of stitches after rotating piece.
Rotate piece to the right and in the first sp: [Ch 1, sc, ch 2, sl st to top of sc].
*Sc in next 3, ch 2, sl st to top of sc.* Repeat *to* across.
Sl st in same sp as last sc.
Rotate piece to the right and work along the side of rows 1-3.
Sl st once so you are at about the middle.
In the same sp: [Ch 1, sc, sl st], Sl st in next.
Fasten off leaving a long end for sewing.
Note: The side facing you is the RS.
Body
With C2:
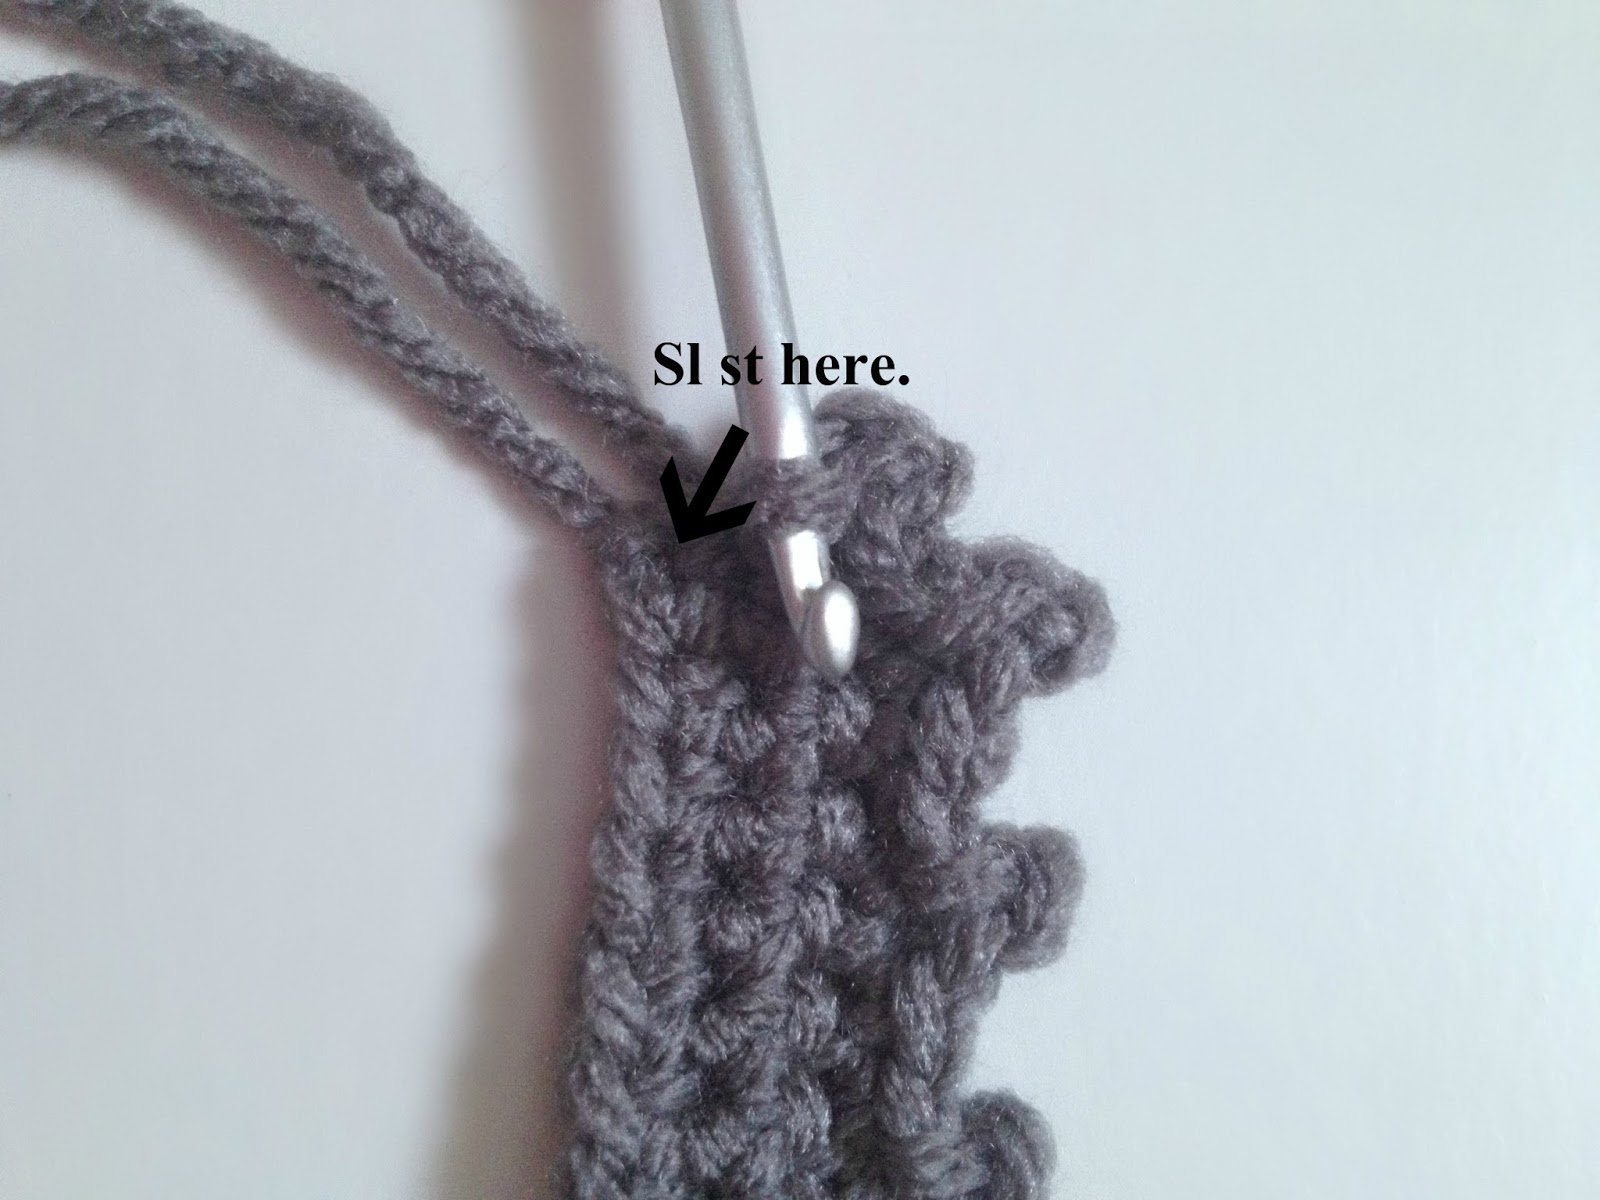
With RS facing you, rotate piece to the right and use your fingers to hold down the spikes so you can work in the back loops easily that were left unworked previously. Join with a sl st in the space that was indicated to place a stitch marker in row 3 of the track.
You can now remove the stitch marker.
Row 1: Ch 1, dc in same and in each BLO across.
Ch 1, turn.
Row 2: Dc in same and in each across.
Turn.
Row 3: Sk 1st sp,
Sl st in next 3, sk 2, 6 dc in next.
Sk 2, sl st in next and 3 more.
Rotate piece to the right so you can work on the side of rows 1-2.
Ch 1. Sl st twice down the side, this should bring you to about the middle.
Ch 8.
Hdc in 2nd ch from hook and in each across (7 hdc total).
Sl st in the same sp that your chain began in.
Fasten off leaving long end for sewing.
At this time you can also sew in the two shorter ends to get them out of the way.
Tires
(make 3)
Or use 3 (15 mm) buttons
With C3:
Magic Circle, ch 1, 6 sc in circle. Pull circle tight, join.
Fasten off.
Sew your tires on to the track, sew in ends from tires.
Optional: Stitch on a little star to the tank or sew on a small 7mm star button.
If sewing on to another piece:
Use your tapestry needle and sew the applique down starting with the end indicated to leave long on the track. Sew through each spike. Next use the other end indicated to leave long and sew around the entire body of the tank starting with the gun. Sew in ends.